All TV Service Menu Code

Electronic Repair, Manuals, Reference and TV Factory service mode

  • Home
  • Database
  • LCD
  • LED
  • CRT
  • Plasma
  • DLP
  • FORUM
  • Upload
  • Download
  • Join
  • Rss
  • Mobile
  • Panasonic TC-42P1 TV Service menu
  • Grundig TV Hotel mode
  • Zanussi 22ZT907 TV Service menu
  • Panasonic DMR-ES10P DVD Service menu
  • Grundig Chassis 22.1 TV Service menu
  • Grundig Chassis D6 TV Service menu
  • Panasonic TX-15LT2Z TV Service menu
  • Hisense K15 Series TV Service Menu
  • Insignia NS LCD37HD-09 TV Service menu
  • Vestel All model TV Service menu

Panasonic TC-32LX70 TV Service menu

Panasonic | Author | April 13, 2020

Panasonic TC-32LX70 LCD TV Service menu mode

Over-Current Protection Circuit 2

Sound_VCC Protection
During normal operation, the 24 volt output of the P board biases the transistor Q7208 into conduction, causing its collector to become low. The low at the collector of Q7208 causes the transistor Q7214 to turn off. When the PANEL_MAIN_ON command (high) is issued Q7212 turns on. Consequently Q7225 turns off, and IC7215 goes into conduction to provide the SOUND_15V output.
When the 24 drops below the reverse breakdown voltage of D7206, Q7208 turns off, Q7214 turns on to ground the PANEL_MAIN_ON voltage. Q7212 turns off and Q7225 turns on. IC7215 ceases to operate and the Sound_VCC is no longer output.
During normal operation, the anode of D7469 receives 5V and the junction of D7469, D7470, R7486,
and R7492 receives 12V. Due to this condition, the transistor Q7210 remains off. If the SOUND_15V line becomes shorted, diode D7469 goes into conduction to turn Q7210 on. Consequently Q7210 outputs a high to shut down the unit.
Panel_VCC Protection During normal operation, the 24 volt output of the P board biases the transistor Q7208 into conduction,
causing its collector to become low. The low at the collector of Q7208 causes the transistor Q7508 to turn off. When
the PANEL_VCC_ON command (high) is issued, Q7702 turns on. Consequently Q7701 turns off, and IC7212 goes into conduction to provide the PANEL_12V output.
When the 24 drops below the reverse breakdown voltage of D7206, Q7208 turns off, Q7508 turns on to ground the PANEL_VCC_ON voltage. Q7702 turns off, and Q7701 turns on. IC7212 ceases to operate and the Panel_VCC is no longer output.
During normal operation, the anode of D7472 receives 5V and the junction of D7472, D7473, R7493,
and R7488 receives 12V. Due to this condition, the transistor Q7210 remains off. If the Panel_12V line becomes shorted, diode D7472 goes into conduction to turn Q7210 on. Consequently Q7210 outputs a high to shut down the unit.
When the unit is turned on, the TV_Main_On command (high) of IC1100 biases the transistor Q7212 into operation, causing its collector to become “low”. The low at the collector of Q7212 causes the transistors Q7225 to turn off. As a result, IC7215 goes into operation to provide the Sound_15V output.


1. Checks the communication IIC bus lines
2. Provides a SOS History
To Access the Self-Check Mode: Turn the TV on and select an active channel. While pressing the “VOLUME ( - )” button on the main unit, press the “OK” button on the remote control for more than 3 seconds.
This procedure is useful to display the unit’s firmware version and check IC data communications.
The Self-Check function clears channel programmed settings, picture settings, channel labels, LOCK mode settings, and password. It restores the unit to factory shipping settings.

 LCD TV Service menu Panasonic TC-32LX70

Panasonic TC-32LX70 LCD TV Service menu


Panasonic TC-32LX70 LCD check point

To enter the factory Mode, turn the TV on and while pressing the 'VOLUME (-)" button on the main unit, press the "RECALL" button of the remote control three times within 3 seconds.
To exit the factory Mode. Press the Power button on the TV or the Remote Control.
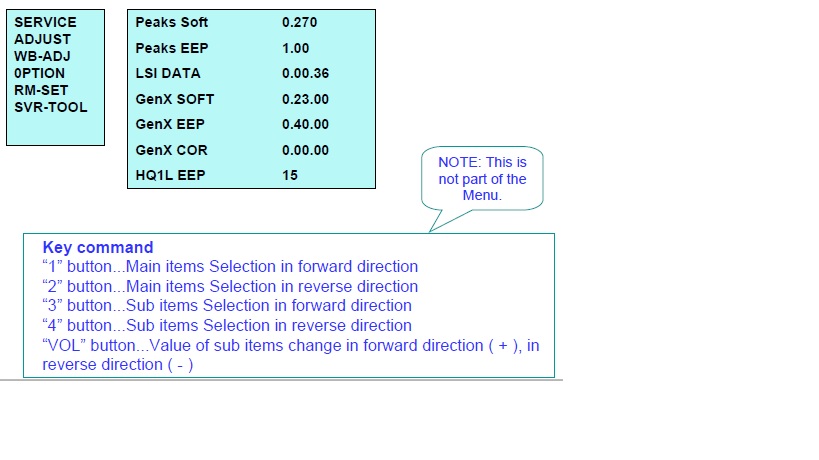
Panasonic TC-32LX70 LCD factory mode
Adjustment Data
“1” or “2” button of the remote control to select the main Adj. item
“3” or “4” button of the remote control to select the sub Adj. Item
“Vol. (-)” or” Vol. (+)” to change the data

Note: Record the original data on a sheet of paper prior to making any adjustment.

To access SRV-TOOL:
1. Select “SRV-TOOL” in the factory Mode menu.
2. Press the [OK] button on the remote control.


Panasonic TH 32LHD7 TV Service menu

Panasonic | Author | April 10, 2020
These service menu works for

PANASONIC TH-32LHD7UXK

PANASONIC TH-32LHD7UXS

PANASONIC TH-32LHD7EK 

PANASONIC TH-32LHD7ES

PANASONIC TH-32LHD7BK 

PANASONIC TH-32LHD7BS

LL10 Chassis model

Panasonic TH 32LHD7 Service mode
CAT (computer Aided Test) mode 
How to access the CAT mode.
Press and the hold the Volume down / - buton on the front panel of the unit and press the status button on the remote control 3 times quickly within 1 second, this will place the unit into the CAT mode.
To exit the CAT mode, access the ID mode and switch off the main power.

Panasonic TH 32LHD7 factory mode

Panasonic TH 32LHD7 TV Service menu


IIC mode
Select the IIC mode by Up/Down button on the remote control at the front page of CAT mode then press the Action button on
the remote control.

How to use the IIC mode
1. Select the alignment Subject by Up/Down buttons on the remote control
2 Select the alignment Item by Left/Right buttons on the remote control
3. Adjust optimum setting by Volume Up/Down buttons on the remote control.
4 The data is memorized when press the R button on the remote control or change the alignment
Subject (or Items).
To exit the IIC mode, press the R button on the remote control.

CD mode
Select the CD mode by Up/Down button on the remote control at the front page of CAT mode then press the Mute button on the
remote control more than 5 sec.

Micom software version (IC9006), this version can be upgrade by
1. replace of new version IC
2. Loading the new version software from loader tool, TZSC07036.
Memory data change
To exit the CD mode, press the R button on the remote control.

SD mode
Select the SD mode by Up/Down button on the remote control at the front page of CAT mode then press the Action button on the
remote control.
To exit the SD mode, press the R button on the remote control.


Panasonic TX-L42U10E TV Service Menu

Panasonic | Author | January 14, 2019

Panasonic TX-L42U10E TV Service Menu GLP24 Chassis

Key Command
• Press the 3/4 button to change the adjustment values or function.
• Press the 1/2 button to step up/down through the functions and adjustments
• Press the numerical button VOLUME (+/-) to change option item.
• Press the OK button after each adjustment has been made to store the required values.


SERVICE
ADJUST
WB-ADJ
OPTION
SRV-TOOL
Peaks SOFT 1.209 OPTION 1 1c
Peaks EEP 01.00.0004 OPTION 2 ef
LSI DATA 0.00.03 OPTION 3 01
STBY SOFT 1.00.00 Model ID 06
STBY EEP 1.03.36 03353100
STBY ROMCOR 1.00.00 00000020
RB Cnt 000
INV Cnt 0000

1,2:MAIN SELECT
3,4:SUB SELECT
9 :PICTURE MENU SELECT
YELLOW:AUTO ADJUST
VOL:ADJUST
OK :WRITE

1,2:MAIN SELECT
9 :PICTURE MENU SELECT
OK :ENTER


Adjustment Method
Sub-Contrast/White Balance Adjustment
1. Remote controller
2. LCD WB meter (Minolta CS-1000A equivalent)
3. Comunication jig
4. Computer for external control

Correlation can be also taken by
CA-210 or equivalent

1. Receive PAL colour bar (100% white) RF signal.
2. Enter “Contrast” adj. In SERVICE mode.
3. Start adjusting by using Yellow Key.
4. If the adjustment finished normally, the letter of Contrast will change from red to black
White Balance adjustment
1. Procedure basically performs checking using the production software and make automatic adjustment using external computer.
2. It adjusts in the mode of : Colour balance Normal as follows.
Viewing Mode Dynamic
WHITE Normal
x: 0.2870 ± 0,010
y: 0.2980 ± 0,010
GRAY Normal
x: 0.2830 ± 0,010
y: 0.3040 ± 0,010

Let the panel standfor more than 3 hours at more than 20 °C.
Basically perform adjustment in the ambient environment of room
temperature more than 20 °C.
The aging time is more than20 min at above room temperature.
Applied signal
100% full colour bar
0.7V p-p white peak
87.5% modulation
100% WHITE
50% GRAY


Panasonic LCD TX-L42U10E TV Servicemode

Panasonic TX-L42U10E TV Service menu

Panasonic TX-L42U10E Safety Precautions
General Guide Lines
1. When servicing, observe the original lead dress. If a short circuit is found, replace all parts which have been overheated
or damaged by the short circuit.
2. After servicing, see to it that all the protective devices such as insulation barriers, insulation papers shields are properly
installed.
3. After servicing, make the following touch current checks to prevent the customer from being exposed to shock hazards.
4. Always ensure panel TKP0E16001 is correctly replaced before returning to customer.


Panasonic TX-P50S20B TV Service Menu

Panasonic | Author | January 13, 2019

Panasonic Plasma Television
Model No. TX-P50S20B

Panasonic Plasma Service Mode
How to enter into Service Mode
Turn on the television
While pressing [VOLUME ( - )] button of the main unit, press [0] button of the remote control three times within 2 seconds.

Panasonic TX-P50S20B TV Service mode
Panasonic TX-P50S20B Picture adjustment

file:///C:/Users/kiki/Documents/DonationCoder/ScreenshotCaptor/Screenshots/Screenshot%20-%201_12_2019%20,%203_31_38%20PM.png

Remote control Key command
[1] button...
Main items Selection in forward direction
[2] button...
Main items Selection in reverse direction
[3] button...
Sub items Selection in forward direction
[4] button...
Sub items Selection in reverse direction
[RED] button...
All Sub items Selection in forward direction
[GREEN] button...
All Sub items Selection in reverse direction
[VOL] button...
Value of sub items change in forward direction ( + ), in reverse direction ( - )

Panasonic TX-P50S20B Plasma TV Service Menu
Photo credit : printablecolouringpages.co.uk-TV


Panasonic TX-22LX TV Service menu

Panasonic | Author | July 01, 2015
This service menu can be used for Panasonic LCD chassis LH1 and LH35 Following model bellow :

Panasonic TX-15LT2M

Panasonic TX-15LT2Q

Panasonic TX-15LT2X

Panasonic TX-15LT2T


Panasonic TX-22LX Service Mode Function
MPU controls the functions switching for each IICs through IIC bus in this chassis. The following setting and adjustment can be adjusted by remote control in Service Mode.
How to enter SERVICE 1 of Panasonic TX-22LX
In sound menu, set BASS to MAXIMUM, and set TREBLE to MINIMUM.
Simultaneously press INDEX button on remote control and DOWN button on the TV set.
How to enter SERVICE 2 of Panasonic TX-22LX
Set the channel to Channel 99.
Press HOLD button on the remote control.
Note: To exit to Service mode, press N or Power button on remote control.

Panasonic TX-22LX Service menu Adjustment
RF AGC Adjustment
1. Connect RF signal generator to antenna terminal.
2. Receive a RF signal, Colour bar.
3. Enter service 1 mode, and select RF AGC.
4. Adjustment begins when the blue button of the remote controller is pushed.
5. It waits to become stable.
6. The STR button of the remote controller is pushed, and adjustment value is saved.
9.2. DVCO Adjustment
1. Connect PAL colour bar signal generator to AV1 (SCART) terminal.
2. Input a PAL Color bar.
3. Enter service 1 mode, and select DVCO.
4. Adjustment begins when the blue button of the remote controller is pushed.
5. It waits to become stable.
6. The STR button on remote controller is pushed, and adjustment value is saved.

TV Service menu Panasonic TX-15LT2Z

Panasonic TX-22LX TV Service menu

Photo credit : mswinds.com


Panasonic TX-15LT2T TV Service menu

Panasonic | Author | July 01, 2015
Panasonic TX-15LT2T Service Mode Function
MPU controls the functions switching for each IICs through IIC bus in this chassis. The following setting and adjustment can be adjusted by remote control in Service Mode.
How to enter SERVICE 1 of Panasonic TX-15LT2T
In sound menu, set BASS to MAXIMUM, and set TREBLE to MINIMUM.
Simultaneously press INDEX button on remote control and DOWN button on the TV set.
How to enter SERVICE 2 of Panasonic TX-15LT2T
Set the channel to Channel 99.
Press HOLD button on the remote control.
Note: To exit to Service mode, press N or Power button on remote control.

Panasonic TX-15LT2T TV Service menu Adjustment
RF AGC Adjustment
1. Connect RF signal generator to antenna terminal.
2. Receive a RF signal, Colour bar.
3. Enter service 1 mode, and select RF AGC.
4. Adjustment begins when the blue button of the remote controller is pushed.
5. It waits to become stable.
6. The STR button of the remote controller is pushed, and adjustment value is saved.
9.2. DVCO Adjustment
1. Connect PAL colour bar signal generator to AV1 (SCART) terminal.
2. Input a PAL Color bar.
3. Enter service 1 mode, and select DVCO.
4. Adjustment begins when the blue button of the remote controller is pushed.
5. It waits to become stable.
6. The STR button on remote controller is pushed, and adjustment value is saved.

TV Service menu Panasonic TX-15LT2Z

Panasonic TX-15LT2T TV Service menu

Photo credit : mswinds.com


Panasonic TX-15LT2X TV Service menu

Panasonic | Author | July 01, 2015
This service menu can be used for Panasonic LCD chassis LH1 and LH35 Following model bellow :

Panasonic TX-15LT2T

Panasonic TX-22LX


Panasonic TX-15LT2X Service Mode Function
MPU controls the functions switching for each IICs through IIC bus in this chassis. The following setting and adjustment can be adjusted by remote control in Service Mode.
How to enter SERVICE 1 of Panasonic TX-15LT2X
In sound menu, set BASS to MAXIMUM, and set TREBLE to MINIMUM.
Simultaneously press INDEX button on remote control and DOWN button on the TV set.
How to enter SERVICE 2 of Panasonic TX-15LT2X
Set the channel to Channel 99.
Press HOLD button on the remote control.
Note: To exit to Service mode, press N or Power button on remote control.

Panasonic TX-15LT2Z TV Service menu Adjustment
RF AGC Adjustment
1. Connect RF signal generator to antenna terminal.
2. Receive a RF signal, Colour bar.
3. Enter service 1 mode, and select RF AGC.
4. Adjustment begins when the blue button of the remote controller is pushed.
5. It waits to become stable.
6. The STR button of the remote controller is pushed, and adjustment value is saved.
9.2. DVCO Adjustment
1. Connect PAL colour bar signal generator to AV1 (SCART) terminal.
2. Input a PAL Color bar.
3. Enter service 1 mode, and select DVCO.
4. Adjustment begins when the blue button of the remote controller is pushed.
5. It waits to become stable.
6. The STR button on remote controller is pushed, and adjustment value is saved.

TV Service menu Panasonic TX-15LT2Z

Panasonic TX-15LT2X TV Service menu

Photo credit : mswinds.com


Panasonic TX-15LT2Q TV Service menu

Panasonic | Author | July 01, 2015
This service menu can be used for Panasonic LCD chassis LH1 and LH35 Following model bellow :

Panasonic TX-15LT2X

Panasonic TX-15LT2T

Panasonic TX-22LX


Panasonic TX-15LT2Q Service Mode Function
MPU controls the functions switching for each IICs through IIC bus in this chassis. The following setting and adjustment can be adjusted by remote control in Service Mode.
How to enter SERVICE 1 of Panasonic TX-15LT2Q
In sound menu, set BASS to MAXIMUM, and set TREBLE to MINIMUM.
Simultaneously press INDEX button on remote control and DOWN button on the TV set.
How to enter SERVICE 2 of Panasonic TX-15LT2Q
Set the channel to Channel 99.
Press HOLD button on the remote control.
Note: To exit to Service mode, press N or Power button on remote control.

Panasonic TX-15LT2Z TV Service menu Adjustment
RF AGC Adjustment
1. Connect RF signal generator to antenna terminal.
2. Receive a RF signal, Colour bar.
3. Enter service 1 mode, and select RF AGC.
4. Adjustment begins when the blue button of the remote controller is pushed.
5. It waits to become stable.
6. The STR button of the remote controller is pushed, and adjustment value is saved.
9.2. DVCO Adjustment
1. Connect PAL colour bar signal generator to AV1 (SCART) terminal.
2. Input a PAL Color bar.
3. Enter service 1 mode, and select DVCO.
4. Adjustment begins when the blue button of the remote controller is pushed.
5. It waits to become stable.
6. The STR button on remote controller is pushed, and adjustment value is saved.

TV Service menu Panasonic TX-15LT2Z

Panasonic TX-15LT2Q TV Service menu

Photo credit : mswinds.com


Panasonic TC-42PD1FA TV Service menu

Panasonic | Author | July 01, 2015
This service menu can be used for Panasonic Chassis GP2D Model bellow:

Panasonic PT-42P1

Panasonic PT-37P1

Panasonic PT-42PD1


How to access Panasonic TC-42PD1FA Alignment Service mode
Press and hold the volume down / - button on the front panel of the unit and press the Recall (PT models) / Status (TC models) [  +] button on the remote control 3 times quickly within 1 second, this will place the unit into the CAT menu

Panasonic TC-42PD1FA Main service mode
Press the ACTION (PT models)/ STR (TC models) button on the remote control.
Select the alignment Subject by the UP or DOWN button of the Cross buttons on the remote control.
Select the alignment item by the LEFT or RIGHT buttons of the Cross buttons on the remote control.
Adjust optimum setting by Volume Up / + and Down / - buttons.
(The reference figures below are normal and used for representative purpose only.)
Exit
To exit the IIC mode, press the menu button on the remote control.
To exit the CAT mode, access the ID mode by the down button of cross buttons and switch off the main power and on again.

TV Service menu Panasonic TC-42PD1FA

Panasonic TC-42PD1FA TV Service menu

Photo credit : monotreal.com


Panasonic TX-15LT2M TV Service menu

Panasonic | Author | July 01, 2015
This service menu can be used for Panasonic LCD chassis LH1 and LH35 Following model bellow :

Panasonic TX-15LT2Q

Panasonic TX-15LT2X

Panasonic TX-15LT2T

Panasonic TX-22LX


Panasonic TX-15LT2M Service Mode Function
MPU controls the functions switching for each IICs through IIC bus in this chassis. The following setting and adjustment can be adjusted by remote control in Service Mode.
How to enter SERVICE 1 of Panasonic TX-15LT2Z
In sound menu, set BASS to MAXIMUM, and set TREBLE to MINIMUM.
Simultaneously press INDEX button on remote control and DOWN button on the TV set.
How to enter SERVICE 2 of Panasonic TX-15LT2Z
Set the channel to Channel 99.
Press HOLD button on the remote control.
Note: To exit to Service mode, press N or Power button on remote control.

Panasonic TX-15LT2M TV Service menu Adjustment
RF AGC Adjustment
1. Connect RF signal generator to antenna terminal.
2. Receive a RF signal, Colour bar.
3. Enter service 1 mode, and select RF AGC.
4. Adjustment begins when the blue button of the remote controller is pushed.
5. It waits to become stable.
6. The STR button of the remote controller is pushed, and adjustment value is saved.
9.2. DVCO Adjustment
1. Connect PAL colour bar signal generator to AV1 (SCART) terminal.
2. Input a PAL Color bar.
3. Enter service 1 mode, and select DVCO.
4. Adjustment begins when the blue button of the remote controller is pushed.
5. It waits to become stable.
6. The STR button on remote controller is pushed, and adjustment value is saved.

TV Service menu Panasonic TX-15LT2Z

Panasonic TX-15LT2M Service menu

Photo credit : mswinds.com


Panasonic TC-37PD1 TV Service menu

Panasonic | Author | June 30, 2015
This service menu can be used for Panasonic Chassis GP2D Model bellow:

Panasonic TC-42PD1F 

Panasonic TC-37PD1F

Panasonic TC-42P1FA

Panasonic TC-42PD1FA

Panasonic PT-42P1

Panasonic PT-37P1

Panasonic PT-42PD1


How to access Panasonic TC-37PD1 Alignment Service mode
Press and hold the volume down / - button on the front panel of the unit and press the Recall (PT models) / Status (TC models) [  +] button on the remote control 3 times quickly within 1 second, this will place the unit into the CAT menu

Panasonic TC-37PD1 Main service mode
Press the ACTION (PT models)/ STR (TC models) button on the remote control.
Select the alignment Subject by the UP or DOWN button of the Cross buttons on the remote control.
Select the alignment item by the LEFT or RIGHT buttons of the Cross buttons on the remote control.
Adjust optimum setting by Volume Up / + and Down / - buttons.
(The reference figures below are normal and used for representative purpose only.)
Exit
To exit the IIC mode, press the menu button on the remote control.
To exit the CAT mode, access the ID mode by the down button of cross buttons and switch off the main power and on again.

TV Service menu Panasonic TC-37PD1

Panasonic TC-37PD1 TV Service menu

Photo credit : monotreal.com


Panasonic TC-42PD1 TV Service menu

Panasonic | Author | June 30, 2015
This service menu can be used for Panasonic Chassis GP2D Model bellow:

Panasonic TC-37PD1

Panasonic TC-42PD1F 

Panasonic TC-37PD1F

Panasonic TC-42P1FA

Panasonic TC-42PD1FA

Panasonic PT-42P1

Panasonic PT-37P1

Panasonic PT-42PD1


How to access Panasonic TC-42PD1 Alignment Service mode
Press and hold the volume down / - button on the front panel of the unit and press the Recall (PT models) / Status (TC models) [  +] button on the remote control 3 times quickly within 1 second, this will place the unit into the CAT menu

Panasonic TC-42PD1 Main service mode
Press the ACTION (PT models)/ STR (TC models) button on the remote control.
Select the alignment Subject by the UP or DOWN button of the Cross buttons on the remote control.
Select the alignment item by the LEFT or RIGHT buttons of the Cross buttons on the remote control.
Adjust optimum setting by Volume Up / + and Down / - buttons.
(The reference figures below are normal and used for representative purpose only.)
Exit
To exit the IIC mode, press the menu button on the remote control.
To exit the CAT mode, access the ID mode by the down button of cross buttons and switch off the main power and on again.

TV Service menu Panasonic TC-42PD1

Panasonic TC-42PD1 TV Service menu

Photo credit : monotreal.com


Panasonic TC-37P1F TV Service menu

Panasonic | Author | June 30, 2015
This service menu can be used for Panasonic Chassis GP2D Model bellow:

Panasonic TC-42PD1 

Panasonic TC-37PD1

Panasonic TC-42PD1F 

Panasonic TC-37PD1F

Panasonic TC-42P1FA

Panasonic TC-42PD1FA

Panasonic PT-42P1

Panasonic PT-37P1

Panasonic PT-42PD1


How to access Panasonic TC-37P1F Alignment Service mode
Press and hold the volume down / - button on the front panel of the unit and press the Recall (PT models) / Status (TC models) [  +] button on the remote control 3 times quickly within 1 second, this will place the unit into the CAT menu

Panasonic TC-37P1F Main service mode
Press the ACTION (PT models)/ STR (TC models) button on the remote control.
Select the alignment Subject by the UP or DOWN button of the Cross buttons on the remote control.
Select the alignment item by the LEFT or RIGHT buttons of the Cross buttons on the remote control.
Adjust optimum setting by Volume Up / + and Down / - buttons.
(The reference figures below are normal and used for representative purpose only.)
Exit
To exit the IIC mode, press the menu button on the remote control.
To exit the CAT mode, access the ID mode by the down button of cross buttons and switch off the main power and on again.

TV Service menu Panasonic TC-42P1

Panasonic TC-37P1F TV Service menu

Photo credit : monotreal.com


Panasonic TC-42P1F TV Service menu

Panasonic | Author | June 30, 2015
This service menu can be used for Panasonic Chassis GP2D Model bellow:

Panasonic TC-37P1F

Panasonic TC-42PD1 

Panasonic TC-37PD1

Panasonic TC-42PD1F 

Panasonic TC-37PD1F

Panasonic TC-42P1FA

Panasonic TC-42PD1FA

Panasonic PT-42P1

Panasonic PT-37P1

Panasonic PT-42PD1


How to access Panasonic TC-42P1F Alignment Service mode
Press and hold the volume down / - button on the front panel of the unit and press the Recall (PT models) / Status (TC models) [  +] button on the remote control 3 times quickly within 1 second, this will place the unit into the CAT menu.

Panasonic TC-42P1F Main service modePress the ACTION (PT models)/ STR (TC models) button on the remote control.
Select the alignment Subject by the UP or DOWN button of the Cross buttons on the remote control.
Select the alignment item by the LEFT or RIGHT buttons of the Cross buttons on the remote control.
Adjust optimum setting by Volume Up / + and Down / - buttons.
(The reference figures below are normal and used for representative purpose only.)
Exit
To exit the IIC mode, press the menu button on the remote control.
To exit the CAT mode, access the ID mode by the down button of cross buttons and switch off the main power and on again.

TV Service menu Panasonic TC-42P1

Panasonic TC-42P1F TV Service menu

Photo credit : monotreal.com


Panasonic TC-37P1 TV Service menu

Panasonic | Author | June 30, 2015
This service menu can be used for Panasonic Chassis GP2D Model bellow:

Panasonic TC-42P1F

Panasonic TC-37P1F

Panasonic TC-42PD1 

Panasonic TC-37PD1

Panasonic TC-42PD1F 

Panasonic TC-37PD1F

Panasonic TC-42P1FA

Panasonic TC-42PD1FA

Panasonic PT-42P1

Panasonic PT-37P1

Panasonic PT-42PD1


How to access Panasonic TC-37P1 Alignment Service mode
Press and hold the volume down / - button on the front panel of the unit and press the Recall (PT models) / Status (TC models) [  +] button on the remote control 3 times quickly within 1 second, this will place the unit into the CAT menu.

Panasonic TC-37P1 Main service modePress the ACTION (PT models)/ STR (TC models) button on the remote control.
Select the alignment Subject by the UP or DOWN button of the Cross buttons on the remote control.
Select the alignment item by the LEFT or RIGHT buttons of the Cross buttons on the remote control.
Adjust optimum setting by Volume Up / + and Down / - buttons.
(The reference figures below are normal and used for representative purpose only.)
Exit.
To exit the IIC mode, press the menu button on the remote control.
To exit the CAT mode, access the ID mode by the down button of cross buttons and switch off the main power and on again.

TV Service menu Panasonic TC-42P1

Panasonic TC-37P1 TV Service menu

Photo credit : monotreal.com


Panasonic TC-42PD1F TV Service menu

Panasonic | Author | June 30, 2015
This service menu can be used for Panasonic Chassis GP2D Model bellow:

Panasonic TC-37PD1F

Panasonic TC-42P1FA

Panasonic TC-42PD1FA

Panasonic PT-42P1

Panasonic PT-37P1

Panasonic PT-42PD1


How to access Panasonic TC-42PD1F Alignment Service mode
Press and hold the volume down / - button on the front panel of the unit and press the Recall (PT models) / Status (TC models) [  +] button on the remote control 3 times quickly within 1 second, this will place the unit into the CAT menu

Panasonic TC-42PD1F Main service mode
Press the ACTION (PT models)/ STR (TC models) button on the remote control.
Select the alignment Subject by the UP or DOWN button of the Cross buttons on the remote control.
Select the alignment item by the LEFT or RIGHT buttons of the Cross buttons on the remote control.
Adjust optimum setting by Volume Up / + and Down / - buttons.
(The reference figures below are normal and used for representative purpose only.)
Exit
To exit the IIC mode, press the menu button on the remote control.
To exit the CAT mode, access the ID mode by the down button of cross buttons and switch off the main power and on again.

TV Service menu Panasonic TC-42PD1F

Panasonic TC-42PD1F TV Service menu

Photo credit : monotreal.com


Panasonic TC-37PD1F TV Service menu

Panasonic | Author | June 30, 2015
This service menu can be used for Panasonic Chassis GP2D Model bellow:

Panasonic TC-42P1FA

Panasonic TC-42PD1FA

Panasonic PT-42P1

Panasonic PT-37P1

Panasonic PT-42PD1


How to access Panasonic TC-37PD1F Alignment Service mode
Press and hold the volume down / - button on the front panel of the unit and press the Recall (PT models) / Status (TC models) [  +] button on the remote control 3 times quickly within 1 second, this will place the unit into the CAT menu

Panasonic TC-37PD1F Main service mode
Press the ACTION (PT models)/ STR (TC models) button on the remote control.
Select the alignment Subject by the UP or DOWN button of the Cross buttons on the remote control.
Select the alignment item by the LEFT or RIGHT buttons of the Cross buttons on the remote control.
Adjust optimum setting by Volume Up / + and Down / - buttons.
(The reference figures below are normal and used for representative purpose only.)
Exit
To exit the IIC mode, press the menu button on the remote control.
To exit the CAT mode, access the ID mode by the down button of cross buttons and switch off the main power and on again.

TV Service menu Panasonic TC-37PD1F

Panasonic TC-37PD1F TV Service menu

Photo credit : monotreal.com


Panasonic PT-42PD1 TV Service menu

Panasonic | Author | June 29, 2015
How to access Panasonic PT-42PD1 Alignment Service mode
Press and hold the volume down / - button on the front panel of the unit and press the Recall (PT models) / Status (TC models) [  +] button on the remote control 3 times quickly within 1 second, this will place the unit into the CAT menu

Panasonic PT-42PD1 Main service mode
Press the ACTION (PT models)/ STR (TC models) button on the remote control.
Select the alignment Subject by the UP or DOWN button of the Cross buttons on the remote control.
Select the alignment item by the LEFT or RIGHT buttons of the Cross buttons on the remote control.
Adjust optimum setting by Volume Up / + and Down / - buttons.
(The reference figures below are normal and used for representative purpose only.)
Exit
To exit the IIC mode, press the menu button on the remote control.
To exit the CAT mode, access the ID mode by the down button of cross buttons and switch off the main power and on again.

TV Service menu Panasonic PT-42PD1

Panasonic PT-42PD1 TV Service menu

Photo credit : monotreal.com


Panasonic PT-37P1 TV Service menu

Panasonic | Author | June 29, 2015
This service menu can be used for Panasonic Chassis GP2D Model bellow:

Panasonic PT-42PD1


How to access Panasonic PT-37P1 Alignment Service mode
Press and hold the volume down / - button on the front panel of the unit and press the Recall (PT models) / Status (TC models) [  +] button on the remote control 3 times quickly within 1 second, this will place the unit into the CAT menu

Panasonic PT-37P1 Main service mode
Press the ACTION (PT models)/ STR (TC models) button on the remote control.
Select the alignment Subject by the UP or DOWN button of the Cross buttons on the remote control.
Select the alignment item by the LEFT or RIGHT buttons of the Cross buttons on the remote control.
Adjust optimum setting by Volume Up / + and Down / - buttons.
(The reference figures below are normal and used for representative purpose only.)
Exit
To exit the IIC mode, press the menu button on the remote control.
To exit the CAT mode, access the ID mode by the down button of cross buttons and switch off the main power and on again.

TV Service menu Panasonic PT-37P1

Panasonic PT-37P1 TV Service menu

Photo credit : monotreal.com


Panasonic PT-42P1 TV Service menu

Panasonic | Author | June 29, 2015
This service menu can be used for Panasonic Chassis GP2D Model bellow:

Panasonic PT-37P1

Panasonic PT-42PD1


How to access Panasonic PT-42P1 Alignment Service mode
Press and hold the volume down / - button on the front panel of the unit and press the Recall (PT models) / Status (TC models) [  +] button on the remote control 3 times quickly within 1 second, this will place the unit into the CAT menu

Panasonic PT-42P1 Main service mode
Press the ACTION (PT models)/ STR (TC models) button on the remote control.
Select the alignment Subject by the UP or DOWN button of the Cross buttons on the remote control.
Select the alignment item by the LEFT or RIGHT buttons of the Cross buttons on the remote control.
Adjust optimum setting by Volume Up / + and Down / - buttons.
(The reference figures below are normal and used for representative purpose only.)
Exit
To exit the IIC mode, press the menu button on the remote control.
To exit the CAT mode, access the ID mode by the down button of cross buttons and switch off the main power and on again.

TV Service menu Panasonic PT-42P1

Panasonic PT-42P1 TV Service menu

Photo credit : monotreal.com


Universal Remote

  • Chunghop RM-168GS code List
  • iWave Supersize Universal Remote
  • Automator URC 200 CD Players
  • Asaki Universal Remote for DVD
  • AMAZONE Universal Remote for DVD

CRT Television

  • Zenit TV Service Menu
  • Hisense HSM 515AV TV Service Menu
  • Grundig CUC 7301 TV Service menu
  • SIERA SG1420 TV Service Menu
  • RCA G27684 TV Service Menu


Plasma Television

  • Samsung HCH 551WX TV Service Menu
  • Beko L5C TFT LCD TV Service Menu
  • Beko LCD PLASMA L6E TV Service Menu
  • Beko Plasma TV Service Menu
  • Samsung Plasma TV Service Menu

LED Television

  • How to enter to Sansui TV Service Menu
  • LG 42LB62 LED TV Service Menu
  • Sanyo LED LCD TV Service Menu
  • How to enter to Telefunken TV Service Menu
  • Konka LED TV Service Menu

LCD Television

  • Hisense LCD 19V87 TV Service menu
  • Insignia NS LCD37HD-09 TV Service menu
  • Hisense K15 Series TV Service Menu
  • Hisense MT5380 TV Service menu
  • Grundig 42PX TV Service Menu


  • FORUM
  • Announce
  • Claim
  • Contributor
  • Universal Remote
  • Terms of Service
  • Privacy Policy
  • About
  • Contact
© 2008 - tvservicemenu. All Rights Reserved