Hitachi 42HDT79/DW2-U
Hitachi 42HDS69/DW2-U
1 ADJUSTMENT PROCEDURE START-UP
The 42HDT79 42HDS69 and 42HDX99 PDP TV sets pass through adjustment procedures during the assembly process. These adjustments must be done to assure the best performance of the PDP set for the consumer.
Also, after servicing, these same adjustments must be done. The adjustments are all made through the I2C bus by changing data in the Adjustment mode menu.
Table 2 on pages 38-46 shows the complete parameter list with a brief description, signal format, the adjustment range and the initial data.
1.1 HOW TO GET TO ADJUSTMENT MODE
Chassis adjustment mode can be access by pressing the R/C keys MENU + MENU + 8 + SELECT to enter adjustment mode. For some parameters the only way to see them is by selecting the parameter number than pressed SELECT in order to see it; then DATA can be change if other parameter needs to change then press channel down button then repeat the same procedure.
Other way to access this mode is by use JIG R/C code: (9C Hex).
To escape from Adjustment Mode press “INPUT” key on Side panel or EXIT key of R/C to exit service adjustment mode.
1.2 CHANGING DATA AND SELECTING ADJUSTMENT
CODE
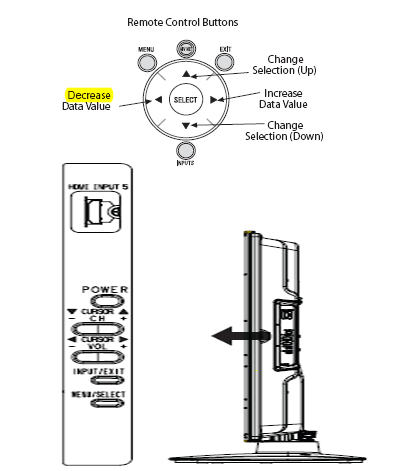
When the PDP set is in adjustment mode, the cursor < > and MENU keys of the remote control or front panel may be used as the adjustment keys.
A. Use any Hitachi remote control when making an adjustment.
CH down and CH up keys are used for selecting adjustment item.
Volume (< >) button are used for changing data values.
MENU key is used to advance through the adjustment mode menus and pages.

B. To make a selection, use the NUMBER pad on the PDP
Remote control example : select DEVICE press 69 then SELECT the DATA shown is "EB" ; if this DATA needs to be change press volume down and up keys to modify, when finish press SELECT key to store the new DATA value. Normal condition.
C. After finishing the necessary adjustment press the remote control EXIT key or EXIT key on the side panel.
Adjustment mode is released and PDP set returns to
normal condition.
2 MEMORY INITIALIZE
2.1 MEMORY INITIALIZE OPERATION
NOTE: The execution of this function returns the adjustment codes to the preset values, therefore,
adjustment data will be lost.
Procedure
(1) Enter Adjustment mode by the method described in sub-items 1.1 and 1.2 from item 1 (“Adjustment
procedure start up”).
(2) Get to the second page of Adjust Mode by pressing remote control “Menu” key once, or with either the
remote control or front panel , cursor keys several times.
(3) Select MEMORY INIT adjust code.
(4) Activate MEMORY INIT by pressing cursor key for more than 3 seconds.
(5) Check the following process for initialization operation.
Hitachi 42HDX99 TV Service menu (All TV Service Menu Code)
5
stars -
"Hitachi 42HDX99 TV Service menu"
by Admin 2
Hitachi 42HDX99 TV Service menu mode, Hitachi 42HDX99 factory mode Written on June 21, 2015


 You are reading Hitachi 42HDX99 TV Service menu.