All TV Service Menu Code

Electronic Repair, Manuals, Reference and TV Factory service mode

  • Home
  • Database
  • LCD
  • LED
  • CRT
  • Plasma
  • DLP
  • FORUM
  • Upload
  • Download
  • Join
  • Rss
  • Mobile
  • Portland PT-1901 Service Menu
  • Vestel LCD 17MB25 TV Service menu
  • ORION T1420MJ TV Service menu
  • Vestel LCD 22' TV Service menu
  • Sony Bravia 32BX3 TV Service Menu
  • JVC LT-32C50BU TV Service menu
  • Hitachi TV Service Menu
  • Panasonic TX-15LT2Z TV Service menu
  • Panasonic TC-42P1 TV Service menu
  • JVC LCD LT-37DM6ZJ TV Service menu

China 15581 TV Service menu

China TV | Author | June 27, 2015
1 Factory adjustment mode
1.1 Enter into factory adjustment menu
Press SLEEP→PIC→DSP→MENU button on the remote controller in order (the period of two
press should be less than 5 seconds), the screen will appear factory alignment menu.
1.2 Factory menu operation
Repeatedly press “MENU” button,then the menu will enter into PAGE 1→PAGE 2→PAGE
3→PAGE 4→PAGE 5 and recycle; press ▲ or ▼ button can select adjustment items upward or
downward, and press ◄ or ► button to confirm or adjust the item’s value.
1.3 To exit the factory menu
Press “SLEEP” button to exit the factory adjustment menu.

2 China 15581 Adjustment method
2.1 B+ voltage adjustment
a) Make sure the power supply is AC120 V/60 Hz (for America or Canada area).
b) Connect the digital voltmeter to B+ testing point,receive A7 signal, set the picture control to
“ NATURAL” status, adjust RP501 to make B+ voltage be 145 V±0.3 V (just for TOSHIBA
pure flat CRT, as regards to other CRT, B+ value will be marked on the parts list.)
c) In STAND BY mode, the B+ voltage will be about 84 V.
2.2 OSD position adjustment
Receive NTSC signal, change the factory adjustment menu page 3 OSD item’s value to make user’s
menu be in screen’s center position.

2.3 China 15581 AGC adjustment
a) Receive 60 dB split field (or grey-scale) signal.
b) Use oscilloscope or digital voltmeter to monitor tuner 1 pin’s voltage (RFAGC pin).
c) Select factory adjustment menu page 4 R-AGC item, making use of [←][→] button to increase the
value from down to up until the voltage just reach 4.0 V,at this time picture noisy spots should
disappear basically. Otherwise continue to fine tune R-AGC item.
d) Exit the factory menu.
China 15581 TV Service menu

Photo credit : meddiodesign.com


2.4 China 15581 Focus adjustment
2.4.1 Receive A12 signal, set picture mode to “MEMORY 2”status.
2.4.2 Adjust FBT FOCUS potentiometer to make screen’s B area’s focus optimum.
2.5 Screen-grid voltage, white balance adjustment
2.5.1 Receive A7 split field signal, set picture mode to “MEMORY 3“ status.
2.5.2 Keep RCUT’s value, not change it (for example set it to 60), roughly adjust GCUT and BCUT
value to make white balance basically normal.
2.5.3 Set colour, contrast to minimum, set brightness to 50. Use oscilloscope to monitor CRT board red
gun waveform, adjust PAGE 4 BRTS value to make black level be 180 V.
2.5.4 Adjust SCREEN (accelerating electrode) potentiometer to make picture brighten 4 lattices.
2.5.5 Fine adjust white balance (colour temperature: 12000K±8MPCD X=0.270±0.008
Y=0.283±0.008).
2.5.6 Adjust PAGE 2 BRTN value to make colour , brightness, contrast all be minimum, picture“white
block“slightly lights up.
2.6 Horizontal, vertical scanning center adjustment
2.6.1 PAL (50 Hz) horizontal、vertical center adjustment
Receive G23 signal, set picture mode to “MEMORY 2“status, fine tune vertical center VP50,
horizontal center HPOS, to make picture center be in accordance with screen center.
2.6.2 NTSC (60 Hz) H-center, V-center adjustment
Receive A6 signal, set picture mode to “MEMORY 2“ status, adjust V-center VP60, H-center HPS,
to make picture center be in accordance with screen center.
2.7 Vertical scanning amplitude adjustment
2.7.1 PAL (50 Hz) vertical amplitude adjustment
Receive D35 signal, set picture mode to “MEMORY 2“ status, adjust vertical amplitude HIT, to
make picture up/down overscanning be screen size’s 8%.
2.7.2 NTSC (60 Hz) vertical amplitude adjustment
Receive A12 signal, set picture mode to “MEMORY 2“ status, adjust V-amplitude HITS, to make
picture up/down overscanning be screen size’s 8%.
2.8 Raster correction adjustment、H-amplitude adjustment
2.8.1 PAL (50 Hz) raster correction adjustment , H-amplitude adjustment.
Receive PAL white crosshatch signal, set picture mode to “MEMORY 2“ status, adjust DPC to
make raster distortion be in minimum, adjust WID to make picture left/right overscanning be
screen size’s 8%.
2.8.2 NTSC (60 Hz) raster correction adjustment
Receive NTSC A21 signal, set picture mode to “MEMORY 2“ status, adjust DPCS to make raster
distortion minimum, adjust WIDS to make picture left/right overscanning be screen size’s 8%.
2.9 If scanning linearity distortion and raster geometrical distortion can not reach the requirements, and
if necessary, can make use of factory adjustment menu to adjust the following items:
VLIN V-linearity adjustment (PAL)
VLIS V-linearity adjustment (NTSC)
VSC Vertical S-correction adjustment (PAL)
VSS Vertical S-correction adjustment (NTSC)
CNRT Top corners’ correction
CNRB Bottom corners’ correction
KEY Trapezoid correction (PAL)
KEYS Trapezoid correction (NTSC)
2.10 Maximum sound output power
Receive single tone signal, set volume to maximum, the sound output power is 2×8 W. (can fine
adjust factory menu V100).
3 Checking points
3.1 High voltage check
3.1.1 Connect high voltmeter to CRT second anode and GND.
3.1.2 Receive A7 signal, set picture mode to “MEMORY 2“ status, measure the high voltage value, the
reading should be 30.0 kV±1 kV.
3.1.3 When setting brightness and contrast to minimum(zero beam current),measure the high voltage
value, the reading should not exceed 32 kV.
3.2 CRT filament voltage check
Receive A7 signal, set picture mode to “NATURAL“ status, use effective value voltmeter to
measure CRT filament voltage, the reading should be (6.3±0.3)Vrms.
3.3 X-ray protection check
3.3.1 Receive A7 signal, set picture mode to “MEMORY 2“ status.
3.3.2 Short S301, X-ray protection circuit should effect.
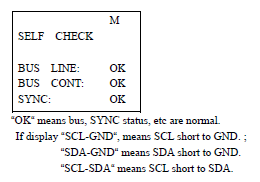
3.4 “Self-check“function check
Press “SELF-CHECK“button, the screen will display the following information:
3.5 Picture and sound check
3.5.1 Receive standard TV signal.
3.5.2 Make use of picture control buttons to check colour, contrast, brightness, sharpenss, tint’s control
function.
3.5.3 Make use of sound control buttons to check sound control function.
3.6 Sub-brightness check.
Receive A7 signal, set colour, contrast, brightness all to 0, picture left one lattice slightly lights up.
3.7 This set can produce 14 kinds of testing signals by itself. In factory menu when select some
adjustment item, every press of AV button for one time, it will produce one testing signal.
3.8 Colour purity and convergence check (in normal way).
3.9 AV terminal input/output check
3.10 Other control buttons on the set/remote controller function check.



China 3S10 TV Service menu

China TV | Author | June 25, 2015

China Flat TV Chassis 3S10 factory mode

ALIGNMENT INSTRUCTION (3S10)
1. Preface
This ADJUST MANUAL is only used for 3S10 chasiis, and guides to make adjust equipments. It is only a reference.
2. Instruments For Adjustment
a. TV signal generator
b. 20MHz 2-channel oscilloscope
c. Adjust jigs
d. Sweep Signal Generator(option)
e. Digital voltmeter
f. White balance adjust equipment.
3. How To Enter And Exit Factory Mode
a. Enter factory mode by pressing MENU button, AV button and ANAL button in turn or pressing the SERVICE button(on the right of MENU button,we can add this button for easy to enter service mode in factory).Press OK to enter Service 2.0 and Design mode.
b. Exit factory mode by pressing PP or pressing STANDBY button.
4. Chassis Adjust

China 3S10  VCO Adjust
a. Set TV Signal Generator to output a 38.9MHz, stranger than 80dBuv PAL color bar signal.
b. Signal inputs to TUNER’s IF terminal or pin5 of SAW101 through a 0.01UF/50V capacitor
c. Connect 220V AC (50/60Hz) and Switch on power switch. Enter Service 2.0 menu.
d. Press AV button after picking out VCO Coarse or VCO Fine item by PROG+/- buttons. VCO
is well adjusted automatically if the character OK appears at the bottom of screen. (If OK can not appear automatically,please fine tune LC238 and re-try again)
e. The following adjustment is suitable for TV sets with SECAM L/L’ system.
Set TV signal Generator to output a 34.4MHz Signal ,set TV set to VHF-L band. Press AV button after picking out VCO Coarse L1 or VCO Fine L1 by PROG+/- buttons. The VCO of SECAM L’ system is well adjusted if the character OK appears automatically at the bottom of screen.
Note: After VCO is well adjusted,exit factory mode by pressing PP button at first, switch off power switch, then withdraw IF signal.

TV Service menu China 3S10

China 3S10 TV Service menu

Photo credit : meddiodesign.com


Signal
IF Trap(LC101) Adjust For RF NTSC
a. Receive RF NTSC signal.
b. Adjust LC101 until picture is best.(We also can use a sweep sigmal generator to get best the trap point)

AGC Adjust China 3S10
a. Receive 60dBuV RF signal.
b. Enter Service V2.0 mode and get Tuner AGC PAL item, adjust PAL AGC by VOL+/- buttons until picture’s noise just disappears and no distortion under 100dBuV level.
c. If TV has SECAM LL1 system:enter Service V2.0 mode and get Tuner AGC LL1 item, adjust SECAM LL’ AGC by VOL+/- buttons until picture’s noise just disappears and no distortion under 100dBuV level.
d. If TV has SECAME LL1 fsystem:press OK key to enter design menu,set AGC Gain PAL to 1,set AGC Gain LL1 to 3

Main Power Adjust (B+)
a. Switch on power switch.
b. Measure the voltage with digital voltage meter between two terminals of C615.
c. Adjust VR601 to obtain 110+/-0.5V on the Digital Voltage meter. (The voltage will have a little difference
when use difference type of CRT.ORION A51JSW91X50 CRT is 118V;HITACH CRT is 110V)
5.Complete TV General Adjust

Screen Voltage Adjust(G2).
Set TV set to factory mode without signal input, Then press MUTE button, a horizontal line appears.
a. Adjust the “SCREEN” knob of FBT until a horizontal line is just can be seen.
b. Pressing MUTE button to exit one line mode .

Focus Adjust China 3S10
a. Receive CROSS HATCH PATTERN, set picture to Dynamic statue by pressing PP button.
b. Adjust the “FOCUS” knob of FBT to get a most clear picture.

White Balance Adjust China 3S10 .
Receive black & white pattern (PAL SYSTEM)
a. Set picture to Standard statue, adjust white balance equipment to get 2cd/m2 at low brightness and 100cd/ m2 at high brightness.
b. Enter white balance adjust mode of factory mode. Two probes of white balance equipment close up the low brightness and high brightness area.
c. Adjust Red Gain ,Green Gain ,Blue Gain ;DC Red,DC Green,(DC Blue is better to fixed to 64) using remote handset to meet factory requirement.

Horizontal/Vertical Central Adjust
a. Receive MONOSCOPE PATTERN.
b. Get H Position item,use VOL+/- buttons to set H center of the picture to meet factory requirement.
c. Vertical central can not be adjusted by IIC bus. But we can use a 1.5K /2W resistor(R312 or R311 ) or omit it to adjust it

SUB-Brightness Adjust China 3S10
a. Receive GREY SCALE/COLOR BAR pattern.
b. Enter Service V2.0 mode.
c. Press PROG +/- buttons to select Bright Max. Set a fixed value by VOL+/- buttons (The value will be
difference when use difference type of CRT.. ORION A51JSW91X50 CRT CRT is 63).
d. Press ANAL button to get Bright Min item and bright, contrast ,color become zero automatically. Press
VOL+/- buttons to make the second darkness bar of GREY SCALE part loom.Press PIC again to exit this
mode

China 3S10  Vertical Amplitude Adjust
a. PAL system: adjust under VAMP 50.
b. NTSC system: adjust under VAMP 60.

Sub-Tint adjust China 3S10
a Receive NTSC RF signal. Set main Tint to center (zero).
c Set TV set in SERVEICE V2.0 mode and get Sub Tint item.
C Adjust SubTint using VOL+/- buttons until tint is best.

Set Picture’s Standard Data China 3S10
1.Adjust brightness/contrast/colour to the best mode you think Standard should be.
2 Enter white balance adjust mode,then press S.MODE key ,MCU will store currunt brightness/contrast/colour data into Standard

Apr Threshold Adjust China 3S10
It is at the item of white balance adjustment menu. Apr means Automatic RGB Peak Regulation.It is used to
increase the contrast of pictures with low contrast and avoid clipping at RGB output for picture with high peak amplitudes. Chang it’s value to get perfect contrast quality of picture.It maybe different when use different CRT.( ORION A51JSW91X50 CRT sets 15)

E-W correction And H-Wide Adjust For Pure Flat CRT
1. Receive cross pattern and set picture in Standard mode use PP key
2. Adjust VR801 to set picture’s wide
3. Adjust VR802 to get a good linear pattern
4. Adjust VR801 to set picture’s wide if it is changed after adjust VR802


Hyundai 3Y18 TV Service Menu

China TV | Author | January 10, 2015
Hyundai 3Y18 TV Service Mode
The code also use for China TV Chassis 3Y18.
Press MENU => Q.VIEW => MUTE to enter factory mode.
Press Q.VIEW to enter HEAT.RUN
Use channel button to select parameter
Use volume up/down button to increase or decrease the value settings.
TO save and exit press MENU.
Screen voltage adjustment
Set the Television to TV or standard mode and unplug the FM antenna, no signal input to television
Press Menu => Q.VIEW => Mute to enter factory mode page 3 "V.KILL"
Press Volume up button on the remote control to adjust.
TO return to other factory mode page press "MENU" button

TV Service mode Hyundai 3Y18
Photo by pacificmediatek.com

Hyundai 3Y18 TV Service Mode
Before you entering Hyundai China TV factory mode to change any value on the factory service mode, please write down all the original factory settings. tvservicemenu are not responsibility for any damage, data error and unwanted effect after using our service code and information on these page.
Original remote or universal remote control needed as a tools to program the factory mode (Recommended use the original remote control).
If the code above do not match to your television please browse another service code in sitemap page.


China LCD and CRT TV Service Menu

China TV | Author | October 30, 2014
China LCD and CRT TV Service Menu
Before you entering China LCD and CRT TV factory mode to change any value on the factory service mode, please write down all the original factory settings. tvservicemenu are not responsibility for any damage, data error and unwanted effect after using our service code and information on these page.

China LCD (Liquid Crystal Display) and CRT
China TV using TDA93412NC IC
You can use tv remote or universal remote.
Press Menu - display a picture menu and enter the code 6 4 8 3 - M symbol displayed on the screen.
To exit the factory mode and return to normal press Power button on the remote control.
In factory mode {"M" mode) there are 10 menu entirely. Menu 1 and Menu 4 can be selected directly, but the menu 5 and Menu 0 must choose the steps: Press CALL, to call the "M", press LOCK, then press any of the numeric keys 5 to 0.
For example, to select Menu 7, you must press the LOCK CALL and turns and then press 7.

Service Mode China LCD and CRT TV
Photo by www.lg.com

Chassis UOC-TDA9384
Press CALL, PRESS MUTE and 980 codes. In the upper left corner there is a symbol of M.
Chassis HAIER

TDA9370PS / N2 / AI0961 24c08
Press QV hold about 4 seconds and then press the button on the remote control Menu1.
Press the TEST button on the RC unit for factory use.
The "TEST" is displayed on the screen. Digital Press, (Mkey) and corresponding on-screen display will appear.
Some time "PASSWORD" will appear on-screen display, you need to enter 828.

TDA9384PS / N2 / 31FM-OSD and use memory 24c08
Press sequence CLOCK, pm, TIMER (DISP)
Press 0 - 9 to select MENU
To enter the factory mode press SUB PAGE button on the remote control, while you press the volume down (Vol+)

Chassis UOC -TDA9381 (C312)
Press the "MENU" Button button and press the code 8,5,0,0. of M symbol will show In the upper left corner. Select the desired menu press 0 to 9 following your own chose.
TDA9381C38ND
OM8370-B-16NB

China TV use LC86332A-51C7 IC
Press the holes that are already available in the remote
Press the MENU 8 6 3 3.
China TV LC86332B - 52Z6, 53L1
Press the holes that are already available in the remote
Press the MENU 8 6 3 3 or 6 4 8 3.

Chassis 3Y11 / 3Y01 / 4Y01 LC863324A-5S68
Press MENU 2 times - RECALL, QView, MUTE
UСom ST6-ELAME2
Click the button: SKIP, Volume down - FINE TUNE

LC863532A-57P1 -57Z0
Two ways to enter service mode
#1. Press the hidden button located above. If the hidden button is missing, by opening the control panel, find the contact that led to the closing of two SERVICE menu. Standard matrix, 8x4, usually entered BUS press P + P-STBY and 9.5, Sleep
#2. Clicking the MENU button three times to enter the Settings page. Press P + or P- select SWITCHING line. Dial the code "2483." TV enters the PAGE MENU. Turn the page menu button press MUTE PAGE, Disable Vertical - TV / AV. To enter the service menu of 3 or higher, you must set the OPTION PAGE 1.

LC863328A 5W63, 52E5, 56C9 / LC863320A-5R76
Press RECALL , press Volume down on the panel while hold press RECALL
Chassis 502 LC863532 - 54D5, 54H7, 5Z00, 50S8, 50S9, 52Y7
Two metod to enter factory mode
# Plug in the supplied remote hole
# Atur volume 0, press MENU 6 5 6 8.

Chassis 3S10 ST92185BN4B1 / PBI - 3S10B-ENG / RUSS W / O
There are two ways to enter the service mode:
Press the hidden button and the MENU button on the right of
Press and hold the MENU button on the order of AV ANAL
Pressing OK will enter the group option.
For IAC 2000 code: 1124, with MENU = MENU, AV = AV, ANAL = CHIFT + B, OK = MUTE, PP = CHIFT + OK.
To exit the service menu you have to click on the TV or PP.

Chassis PT90, ST92195C7B1 / MIF, ST92195C7B1 / PFT
Turn on your TV.
Select FEATURES MENU.
Dial code 1923

TMP87CM38N -2A55, -3GG3
Adjust volume to 0, press Volume down on TV panel and hold it while pressing the CALL / disply on the remote control. The screen will display the symbol D. D symbol is a simple factory S mode, which is available to the factory mode from the menu 0, 1 and 2. To enter the Factory mode is extended to S mode, press SYSTEM.

MCL437F, TMP87CK38N-1A72
Press the MUTE button on the remote control is released, press MUTE again and hold it while you press MENU on the TV.

The screen will display the symbol D. This is a simple service mode S. To enter the service mode is extended to S mode, repeat the operation. The screen will display the symbol D.

TMP87PS38N-M13VR2V1
Press volume down on television panel until the colume decrease to 0 and hold while you press DISPLAY on the remote control.
The screen will display D symbol , This is a simple S factory mode . To enter the service mode is extended to S mode, repeat the operation. The screen will display the symbol D.
The transition between the two groups through the DISPLAY menu. Selection of options and make a determination of Channel up, Channel down, volume up and volume down.

TMP87CM38N-3GN5, TMP87CK38N-2B46, Chassis TB1238
To enter the service mode via the following procedure:
Press for the introduction of double - digit , channel -/-- number and program 12.
After the transition, select program 38.
Channel 38 MENU button a second menu with POS.LOCK.
Press MUTE. The first sign that everything is done correctly there will be an indication of muting
Enter the password 1 2 3 8. TV will go into service mode and the screen displays the M symbol.
(The latest model of entry into the service mode for multiple versions of the processor has been simplified to a standard for Changhong - at zero volume.)

TDA9353PS / N1 / 2S0511
TDA9351PS / N2 / 2I0927
TDA9353PS / N1 / 3S0342
TDA9350PS / N1 / 2S0512
TDA9380PS / N1 / 1L0231
TDA9360PS / N1 / 4S0415
TDA9360PS / N1 / 4S0430
TDA9353PS / N1 / 2I0269
TDA9350PS / N2 / 2I0851
TDA9350PS / N1 / 2L0296
TDA9350PS / N1 / 2K0172
TDA9350PS / N1 / 2K0223
TDA9353PS / N2 / 2I1186
TDA9351PS / N2 / 2I1192
TDA9353PS / N1 / 2L0297
TDA9350PS / N1 / 2S0296
TDA9350PS / N1 / 2S0510
TDA9350PS / N1 / 2S0546
TDA9353PS / N1 / 2S0596
TDA9353PS / N2 / 2I0869


China LC ICs TV Service menu

China TV | Author | August 15, 2009
Enter to China LC ICs TV Service menu factory mode
At the state of "PRESET"."Ch Exchange",press 2483 to enter factory menu then press
mute, you can translate the pages.
At the last page of factory menu, hold\keep all the ready state & exit by pressing Menu.
Changethe enactment CH+/CH- choose the item which you want to change.
Vol+/Vol- change the item you have choosed.
LOGO Setting Key
0/1:Logo vertical position adjust
2/3:Logo Horizontal position adjust
4:Logo color adjust
5:Logo font zise
6:Switch line for adjust
7:reset logo position
Menu:save & exit
CH+/CH- : select the caracter to be adjust Vol+/Vol- : Adjust the selected character

Service menu mode China LC ICs TV  
Photo credit to www.noodleprincess.com


China TV Service menu

China TV | Author | May 17, 2009
Before you entering China TV factory mode to change any value on the factory service mode, please write down all the original factory settings. tvservicemenu are not responsibility for any damage, data error and unwanted effect after using our service code and information on these page.
China TV Service menu code for universal board using one of the codes below:
Few step instruction
Step 1.Press menu on remote control, input this number 6568
Step 2.Press menu on remote control,input this number 6483.
Step 3.Press menu on remote control,input this number 628
Step 4.China TV chasis use ic sc 7461, enter service / factory mode short IC pin 2 & pin 16.
Step 5.If appear lock picture in tv screen, press display key in 10 second.
For General tv china press display on remote control then press volume down on tv panel ,or press simultaneously review/recall on remote control volume down on television panel.

 
Photo credit to blogs.finnishpod101.com


China TV Service menu for universal board, Enter the factory mode by input the code bellow Few step instruction : 
How to use the code ?
Few step instruction
Step 1.Press menu on remote control, input the number
Step 2.Press menu on remote control, input the number
Step 3.Press menu on remote control, input the number
Or
Enter the factory mode following your service manuals and use the code bellow;
1147, or 1150, 1167,  1185, 1187, 1197, 1199, 1950, 1973, 1999, 2008, 2383, 2387, 2508, 2580, 2588, 2611, 2880, 2888, 0000, 208, 0101, 710, 1234, 4711, 4725, 5880, 6181, 7050, 7168, 7343, 7710, 8093, 8500, 8202, 8593, 8893, 8896, 9301, 9380, 9385, 9527, 9735, 9883.

China TV Service menu for board type VS.TP56L62.2  the code is 1147  

China TV Service menu for board type VS.Tp53U61.2  the code is 208  


China TV Service menu for board type T.VST59.031  the code is 1147

China TV Service menu for board type T.R83.031  the code is 1147  

China TV Service menu for board type VS.Tp53U71.2  the code is 208

China TV Service menu for board type T.R85.031  the code is 1147

China TV Service menu for board type TP.VST59s.PB813  the code is 1147

China TV Service menu for board type TP.HV320.PB801  the code is 1147  

China TV Service menu for board type TR.85.03  the code is 1147

China TV Service menu for board type T.VST59.031 .A81 A8  the code is 1147


China TV Service menu for board type T.V56.03  the code is 1147  

China TV Service menu for board type T56J.11.2  the code is 1147,  2580,   0000,   8896,   208,   308

China TV Service menu for board type T.VST29.03  the code is 1147


China TV Service menu for board type SKR.03  the code is 1147

China TV Service menu for board type SKR.801  the code is 1147

China TV Service menu for board type T5964.81  the code is 1147

China TV Service menu for board type TP.MS338.PC821  the code is 1147


China TV Service menu for board type T.VST29.03  the code is 1147

China TV Service menu for board type TP.MS338.PC821  the code is 1147

China TV Service menu for board type T.VST29.61C  the code is 1147


China TV Service menu for board type LAD.MV59S.G  the code is 7710

China TV Service menu for board type 5800-A8M260-0020    the code is 3195


Universal Remote

  • Chunghop RM-168GS code List
  • iWave Supersize Universal Remote
  • Automator URC 200 CD Players
  • Asaki Universal Remote for DVD
  • AMAZONE Universal Remote for DVD

CRT Television

  • Zenit TV Service Menu
  • Hisense HSM 515AV TV Service Menu
  • Grundig CUC 7301 TV Service menu
  • SIERA SG1420 TV Service Menu
  • RCA G27684 TV Service Menu


Plasma Television

  • Samsung HCH 551WX TV Service Menu
  • Beko L5C TFT LCD TV Service Menu
  • Beko LCD PLASMA L6E TV Service Menu
  • Beko Plasma TV Service Menu
  • Samsung Plasma TV Service Menu

LED Television

  • How to enter to Sansui TV Service Menu
  • LG 42LB62 LED TV Service Menu
  • Sanyo LED LCD TV Service Menu
  • How to enter to Telefunken TV Service Menu
  • Konka LED TV Service Menu

LCD Television

  • Hisense LCD 19V87 TV Service menu
  • Insignia NS LCD37HD-09 TV Service menu
  • Hisense K15 Series TV Service Menu
  • Hisense MT5380 TV Service menu
  • Grundig 42PX TV Service Menu


  • FORUM
  • Announce
  • Claim
  • Contributor
  • Universal Remote
  • Terms of Service
  • Privacy Policy
  • About
  • Contact
© 2008 - tvservicemenu. All Rights Reserved