


Olevia LT30HV
Olevia LT37HVS
1. EDID write in and ADC correction and Parameter Adjustment
1-1 EDID write in
1-1.1 EDID tools
1. Need a PC(Notebook)
2. Software(EDID Write EEprom20060816.exe)and confirm Personal computer hard disk.
Have 2 files (1. C:\EDID Editor(including Hex files) 2.C:\LCD TV\DATA(product and record had No.)
3. EDID PCBA tool、USB cable、RS232 mini din、Print cable、VGA cable
1-1.2 EDID write in to Olevia 232-S12
1. Open Labview EDID Writ Eeprom20060816 file, and confirm software Keep Running.(Refer
Step 1)
2. choice RS-232 (PC System)Port No.(Refer Step 2),choice burn in type (Refer Step 3)
3. press Set Model button(Refer Step 4), and key in 232-S12. and confirm Scalar solution (Refer
Step 5)
4. confirm EDID Jig PCBA (printer port and USB A-B Line connect to PC, HDMI line to TV first ,
MinDim RS-232 to TV)
5. and then press Button(Refer Step 6), then open a save file path in widow.
6. First write HDMI EDID code , if finish OK you can find green light.(Refer Step 7)
7. And have a message that change EDID Jip PCBA VGA Cable to TV.(HDMI line must leave
PCBA Jig.) ,if write OK you can fine green light and show the message that change next set.

Olevia 232-S12 TV Service menu
1-2 Olevia 232-S12 ADC correction and Parameter adjustment
ADC correction and Parameter adjustment tools:
1. PC(Notebook)
2. CHROMA 2325
3. MINOLTA CA-210
4. Software(Gamma Calculator6A_Jason.exe)
1-2.1 Olevia 232-S12 ADC correction
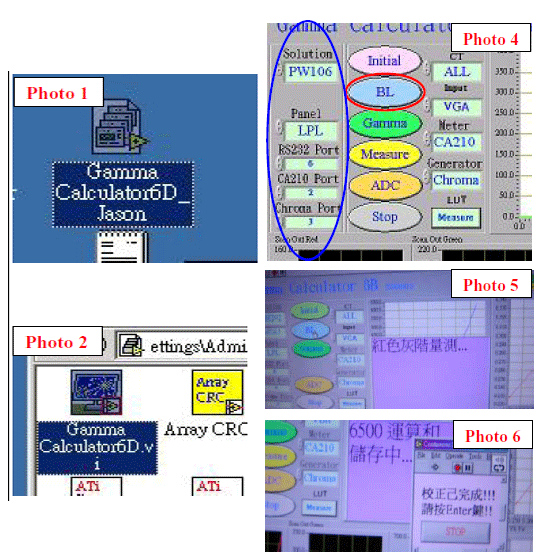
1. Click the icon on the desk "Gamma Calculator" (please see Photo 1), and then Photo 2 would show up.
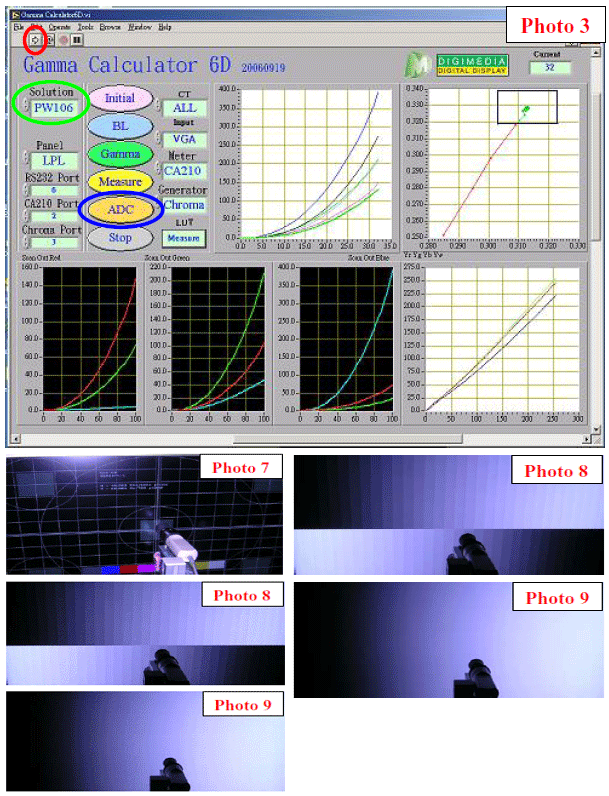
2. Click the icon "Gamma Calculator" of Photo 2, and then Photo 3 would show up.
3. Connect "RS232" &"VGA" with TV.
4. click the "arrow mark" (which is circle by red) in Photo 3, and then click the icon "ADC" also in Photo 3 blue circle.
5. The window will show up with the instruction about component, and then connecting component instead of VGA port.
6. The ADC process is completed once the window with the message "OK" shows up.
Attention:
1. Please make sure it's under "VGA Source" before processing ADC.
2. Please pay attention to different solution for ATI/MTK8202/PW106 as Photo 3 green circle.
3. Please make sure the set-up for RS232 is correct.
1-2.2 Parameter adjustment
1. Click the icon on the desk "Gamma Calculator" (please see Photo 1), and then Photo 2 would show up.
2. Click the icon "Gamma Calculator" of Photo 2, and then Photo 3 would show up.
3. Please follow (as Photo 4 blue circle) to choose the solution & panel mode.
4. Connect the" RS232, USB, VGA changeful wire, and audio wire" with TV. And then connect the other side of VGA changeful wire with the pattern generator, and set up the TV source under "VGA". And please locate the "CA-210" on center of TV screen.
5. Click "BL" button, and the window with "Gamma adjustment" message would show up. Please click
"OK" for next step. (as Photo 4 red circle)
6. Adjust the GAMMA (R;G;B) and then click the button "Enter" after GAMMA adjustment is
completed. (Please follow Photo 5, 6)
7. Please check the result.
Attention:
Check pattern points for adjustment (CHROMA PROGRAM:71 1360_FT_VGA ):
1. Check if the frame is damaged and if the size is smaller than normal, or if those points in the 5
squares correspond well. (Photo 7)
2. Each gray bar should be identified with only pure color.(Photo 8)
3. 256 Gray. L->R--->check if there is sync (influenced by high frequency). (Photo 9)
Universal Remote - Service Mode - TV Factory menu codes
 You are reading Olevia LT27HV TV Service menu.
 Bookmark the Olevia LT27HV TV Service menu page to your favorite.
https://tvservicemenu.blogspot.com/2015/06/olevia-lt27hv-tv-service-menu.html?m=0.
Author : Meilyn, Ricky and Akzai Rajali
Editor : Denny Wowor
Olevia LT27HV TV Service menu (All TV Service Menu Code)
5
stars -
"Olevia LT27HV TV Service menu"
by Admin 2
Olevia LT30HV, Olevia LT37HVS TV Service menu mode, Olevia 232-S12 TV factory mode, Olevia LT26HVX LCD TV Written on June 13, 2015