


SERVICE MODE SANSUI HD LCD 1909
ORIGINAL CODE NO. M39A05WASM19" WIDE TFT LCD TELEVISION WITH DIGITAL TUNER
VERSION (B) DATE OF ISSUE 8/2009 All the
Tfi is unit is provided with the following SERVICE MODES so you can repair, examine and adjust easily.
To enter to the SERVICE MODE function, press and hold both buttons simultaneously on the main unit and on the remote
control for more than a the standard time in the appropriate condition. (See below chart.)
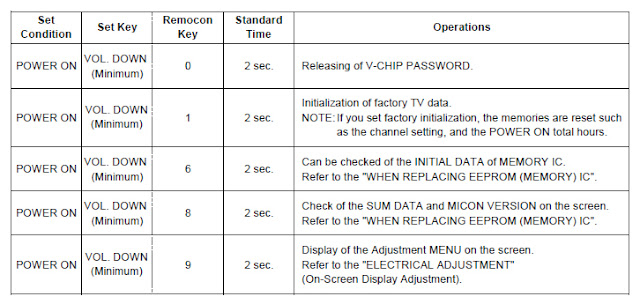
Set Condition Set Key Remocon Key Standard Time Operations
POWER ON VOL. DOWN (Minimum) 0 2 sec. Releasing of V-CHIP PASSWORD.
POWER ON VOL. DOWN (Minimum) i 1 2 sec. Initialization of factory TV data. NOTE: if you set factory initialization, the memories are reset such as the channel setting, and the POWER ON total hours.
POWER ON VOL. DOWN (Minimum) i 6 2 sec. Can be checked of the INITIAL DATA of MEMORY IC Refer to the "WHEN REPLACING EEPROM (MEMORY) IC".
POWER ON VOL. DOWN (Minimum) i i i 8 2 sec. Check of the SUM DATA and MICON VERSION on the screen. Refer to the "WHEN REPLACING EEPROM (MEMORY) IC".
POWER ON VOL. DOWN (Minimum) I i 9 i 2 sec. Display of the Adjustment MENU on the screen. Refer to the "ELECTRICAL ADJUSTMENT (On-Screen Display Adjustment).
SANSUI HDLCD1909 TV Service Menu
WHEN REPLACING EEPROM (MEMORY) IC SANSUI HD LCD 1909 TV
CONFIRMATION OF CHECK SUM, POWER ON TOTAL HOURS AND MICON VERSION
Initial total of MEMORY IC, POWER ON total hours and MICON VERSION can be checked on the screen. Total hours are displayed in 16 system of notation.
NOTE: If you set a factory initialization, the total hours is reset to "0".
Please refer to "CONFIRMATION OF INITIAL DATA" when SUM DATA is not corresponding.
1. Turn on the POWER, and set to the ALL mode.
2. Set the VOLUME to minimum.
3. Press both VOL. DOWN button on the set and Channel button (8) on the remote control for more than 2 seconds.
4. After the confirmation of each check sum, turn off the power.
NOTE: The each item value might be different according to each set.
CONFIRMATION OF INITIAL DATA SANSUI HDLCD1909 TV
If a service repair is undertaken where it has been required to change the MEMORY IC, the following steps should be taken to ensure correct data settings while making reference to INITIAL SETTING TABLE (Attached "INITIAL DATA").
1. Turn on the POWER, and set to the ALL mode.
2. Set the VOLUME to minimum.
3. Press both VOL. DOWN button on the set and Channel button (6) on the remote control for more than 2 seconds.
ADDRESS and DATA should appear
NOTE: No need to set data other position than 0D00~0EFF.
4. ADDRESS is now selected and should "blink". Using the CH. UP/DOWN buton on the remote, step through the ADDRESS
until required ADDRESS to be changed is reached.
5. Press VOL. UP/DOWN button to select DATA. When DATA is selected, it will "blink".
6. Again, step through the DATA using CH. UP/DOWN button until required DATA value has been selected.
7. Pressing VOL. UP/DOWN button will take you back to ADDRESS for further selection if necessary.
8. Repeat steps 4 to 6 until all data has been checked.
9. When satisfied correct DATA has been entered, turn POWER off (return to STANDBY MODE) to finish DATA input After the data input, set to the initializing of shipping.
10. Turn on the Power.
11. Set the VOLUME to minimum.
12. Press both VOL. DOWN button on the set and Channel button (1) on the remote control for more than 2 seconds.
13. After the finishing of the initializing of shipping, the unit will turn off automatically.
The unit will now have the correct DATA for the new MEMORY IC.
ELECTRICAL ADJUSTMENTS SANSUI HD LCD 1909 TV
1. ADJUSTMENT PROCEDURE
Read and perform these adjustments when repairing the circuits or replacing electrical parts or PCB assemblies.
CAUTION
• Use an isolation transformer when performing any service on this chassis.
• When removing a PCB or related component, after unfastening or changing a wire, be sure to put the wire back in its original position.
• When you exchange IC and Transistor with a heat sink, apply silicon grease(YG6260M) on the contact section of the heat sink. Before applying new silicon grease, remove all the old silicon grease. (Old grease may cause damage to the IC and Transistor).
Prepare the following measurement tools for electrical adjustments.
1. Pattern Generator On-Screen Display Adjustment
1. Set the VOLUME to minimum.
2. Press the VOL. DOWN button on the set and the channel button (9) on the remote control for more than 2 seconds to display adjustment mode on the screen
3. Use the CH UP/DOWN button or Channel button (0-9) on the remote control to select the options 4. Press the MENU button on the remote control to end the adjustments.
5. To display the adjustment screen for TV, AV.COMPONENT HDMI and PC mode, press the INPUT SELECT button on the remote control.
6. Receive the DIGITAL broadcasting.
7. To display the adjustment screen fo DTV mode, select the digital channel.
8. Press the VOL.DOWN buttom on the set and the channel
(9) on the remote control for more than 2 seconds.
NO. FUNCTION NO. FUNCTION
C3 R DRIVE(N) 34 BRIGHTNESS MIN
04 R CUTOFF(N) 35 TINT
05 G DRIVE(N) 36 SHARP H1 MAX
06 G CUTOFF(N) 37 SHARP H1 MIN
C7 8 DRIVE(N) 38 SHARP H2 MAX
C8 B CUTOFF(N) 39 SHARP H2 MIN
C9 R DRIVE(C) 40 SHARP H3 MAX
10 R CUTOFF(C) 41 SHARP H3 MIN
11 G DRIVE(C) 42 SHARP H4 MAX
12 G CUTOFF(C) 43 SHARP H4 MIN
13 B DRIVE(C) 44 SHARP H5 MAX
14 B CUTOFF(C) 46 SHARP H5 MIN
15 R DRIVE(W) 46 SHARP V1 MAX
16 R CUTOFF(W) 47 SHARP V1 MIN
'7 G DRIVE(W) 46 SHARP V2 MAX
ia G CUTOFF(W) 49 SHARP V2 MIN
19 B DRIVE(W) 50 CONTRAST CENTER
20 B CUTOFF(W) 51 CONTRAST MAX
29 BAK LIGHT CENT 52 CONTRAST MIN
30 BAK LIGHT MAX 53 COLOR CENTER
31 BAK LIGHT MIN 54 COLOR MAX
33 BRIGHTNESS CENT 55 COLOR MIN
33 BRIGHTNESS MAX 58 CONTRAST 40
2. BASIC ADJUSTMENTS SANSUI HD LCD 1909 TV
2-1: WHITE BALANCE SANSUI HD LCD 1909 TV
1. Place the set in Aging Test for more than 30 minutes.
2. Receive the gray scale pattern from the Pattern Generator.
3. Press the INPUT SELECT button on the remote control to set to the AV mode.
4. Using the remote control, set the brightness and contrast to normal position.
5. Activate the adjustment mode and press the channel button (03) on the remote control to
selecf'R DRIVE (N)".
6. Press the UP/DOWN button on the remote control to select the "R CUTOFF (N)", "G DRIVE (N)",
G CUTOFF (N), "B DRIVE (N)", "B CUTOFF (N)",
R DRIVE (C), "R CUTOFF (C)", "G DRIVE (C)",
G CUTOFF (C), "B DRIVE (C)", "B CUTOFF (C)",
R DRIVE (W), "R CUTOFF (W)", "G DRIVE (W)",
G CUTOFF (W), "B DRIVE (W)" or "B CUTOFF (W)".
7. Adjust the LEF/RIGHT button on the remote control to whiten the R CUTOFF (N), G DRIVE (N),
G CUTOFF (N), B DRIVE (N), B CUTOFF (N),
R DRIVE (C), R CUTOFF (C), G DRIVE (C),
G CUTOFF (C), B DRIVE (C), B CUTOFF (C),
R DRIVE (W), R CUTOFF (W), G DRIVE (W),
G CUTOFF (W), B DRIVE (W) and B CUTOFF (W) at each step tone sections equally.
8. Perform the above adjustments 6 and 7 until the white color is achieved.
Universal Remote - Service Mode - TV Factory menu codes
 You are reading Sansui 1909 TV Service Menu.
 Bookmark the Sansui 1909 TV Service Menu page to your favorite.
https://tvservicemenu.blogspot.com/2020/04/sansui-1909-tv-service-menu.html.
Author : Meilyn, Ricky and Akzai Rajali
Editor : Denny Wowor
Sansui 1909 TV Service Menu (All TV Service Menu Code)
5
stars -
"Sansui 1909 TV Service Menu"
by G777
SERVICE MODE SANSUI HDLCD1909, To enter to the SERVICE MODE function, press and hold both buttons simultaneously on the main unit and on the remote Written on April 18, 2020