All TV Service Menu Code

Electronic Repair, Manuals, Reference and TV Factory service mode

  • Home
  • Database
  • LCD
  • LED
  • CRT
  • Plasma
  • DLP
  • FORUM
  • Upload
  • Download
  • Join
  • Rss
  • Mobile
  • Portland PT-1901 Service Menu
  • Vestel LCD 17MB25 TV Service menu
  • Sony Bravia 32BX3 TV Service Menu
  • ORION T1420MJ TV Service menu
  • Vestel LCD 22' TV Service menu
  • Panasonic TC-42P1 TV Service menu
  • Panasonic TX-15LT2Z TV Service menu
  • JVC LT-32C50BU TV Service menu
  • Grundig TV Hotel mode
  • Grundig Chassis D6 TV Service menu

OEM 17MB15-5 TV Service menu

Vestel | Author | June 30, 2015

OEM / Vestel 42" 17MB15-5 TV Service menu

1. SERVICE MENU ITEMS
1.1. SOUND 1
a) Menu Subwoofer => If ON, Subwoofer option is available in TV set, and the item is visible in sound menu, else Subwoofer is not available. Default “ON”.
b) Subwoofer Level (dB) => This value is gain value of Subwoofer output in dB. -30...12. Default “0” dB.
c) Subwoofer Corner Freq. (x10Hz) => Last low frequency value that is amplified. 5...40.
Default “22” x 10Hz = 220Hz.
d) Menu Equalizer => If ON, visible in sound menu, else invisible. Default “ON”.
e) Menu Headphone => If ON, visible in sound menu, else invisible. Default “ON”.
f) Menu Effect => If ON, visible in sound menu, else invisible. Default “ON”.
g) Menu Wide Sound => If ON, visible in sound menu, else invisible. Default “OFF”.
h) Menu Dynamic Bass => If ON, visible in sound menu, else invisible. Default “ON”.
i) Menu Virtual Dolby => If ON, visible in sound menu, else invisible. Default “ON”.
j) Carrier Mute => If ON, in the absence of an FM carrier the output is muted, else not. Default “ON”.
k) Virtual Dolby Text => Active if VIRTUAL DOLBY is ON.According to the selection; seen in sound menu as 3DS or VIRTUAL DOLBY. Default “3DS”.
1.2. SOUND 2
a) AVL => AVL is controlled from this menu by service user. ON/OFF. Default “ON”.
b) Menu AVL => If ON, AVL item is visible in sound menu, and AVL can be controlled from sound menu by normal user, else AVL is invisible to normal user. ON/OFF. Default “ON”.
c) FM PRESCALE AVL ON => If AVL ON, set value in this item is used as prescale value for the related standard. 0...127. Default “29”.
d) NICAM PRESCALE AVL ON=> If AVL ON, set value in this item is used as prescale value for the related standard. 0...127. Default “62”.
e) SCART PRESCALE AVL ON => If AVL ON, set value in this item is used as prescale value for scart outputs. 0...127. Default “28”.
f) SCART VOLUME AVL ON => If AVL ON, set value in this item is used as volume value for scart1 and scart2. 0...127. Default “116”.
g) FM PRESCALE AVL OFF => If AVL OFF, set value in this item is used as prescale value for the related standard. 0...127. Default “15”.
h) NICAM PRESCALE AVL OFF => If AVL OFF, set value in this item is used as prescale value for the related standard. 0...127. Default “35”.
i) SCART PRESCALE AVL OFF => If AVL OFF, set value in this item is used as prescale value for scart outputs. 0...127. Default “14”.
j) SCART VOLOUME AVL OFF => If AVL OFF, set value in this item is used as volume value for scart1 and scart2. 0...127. Default “122”.

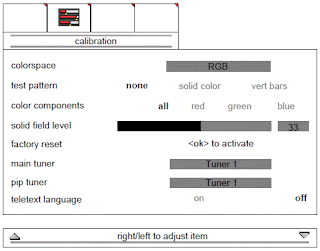
TV Service menu OEM 17MB15-5

OEM 17MB15-5


1.3. Options
a) Burn-In Mode => If ON, full screen flashes in RED, GREEN, BLUE colors unless “Menu” button on Remote Control or Keypad is pressed. This property is used to protect the TV
set from burning on the assembly lines in factory. This item becomes automatically OFF, when First APS item is ON or Factory Reset is pressed. ON/OFF. Default OFF.
b) First APS => This bit is set “ON” in the factory. When the TV set is opened for the first time it directs the user to make automatic search in both digital and analog modes.
c) APS Volume => After First APS function finishes, the volume of the TV is that value.
Default “10”.
d) AGC(dB) => Tuner AGC value. Default “15”.
e) Power-Up Mode =>Normal, Last State, Stand-by. Default “Last State”
f) PDP Working Hour =>Displays Panel Run time in decimal.
g) Factory Reset => OK to activate. When OK pressed on this item, factory defaults loaded.
h) Enter Flash Mode =>OK to activate. When OK pressed on this item, flash mode is entered, SW starts to wait for uploading the new SW.
1.4. Features
a) Blue Background => If ON, Blue Background is visible in Features Menu else not. Default “ON”.
b) Menu Transparency => If ON, Menu Transparency is visible in Features Menu else not. Default “ON”.
c) Menu Timeout => If ON, Menu Timeout is visible in Features Menu else not. Default “ON”.
d) Backlight => If ON, Backlight is visible in Features Menu else not.Default “OFF”.
e) Single Tuner => If OFF, two tuners are available on the chassis. Fixed “ON”.
f) Dynamic WB => Default
1.5. Teletext
a) TOP TXT => ON/OFF
b) Fast TXT => ON/OFF
c) Teletext Language => Teletext Language may be controlled from this menu by service user.
d) Txt Start RF
e) Txt Start Ext
f) Txt Start Mix
g) Menu Teletext Language => If ON, Teletext Language item is visible in Features Menu, and
Teletext Language can be controlled from Features Menu by normal user, else Teletext
Language is invisible to normal user.
1.6. Tuner Options
a) Switch Low Band
b) Switch Mid Band
c) Switch High Band
d) Boundry1 Low Byte
e) Boundry1 High Byte
f) Boundry2 Low Byte
g) Boundry2 High Byte
h) Control Byte
These values need to be filled in the factory acording to the tuner used on the chassis.
i) Store => OK to store; when the values are entered correctly OK needs to be pressed on this item to store the values.
OEM 23" 17MB18 TV Service menu

Vestel | Author | June 29, 2015

OEM 23" 17MB18 TV Service menu mode settings

UOCIII Service Menu
Turn on the TV.
Press “Menu” (M) and “4” ”7” “2” “5” buttons of RC respectively. The following menu will displayed on the screen.

Enter register index number directly from RC or use P/CH + and P/CH – buttons in order to go any register setting.
Press Volume + and Volume - buttons of RC in order to change the register value
Press “TV” button from remote control in order to turn the UOC service menu off.
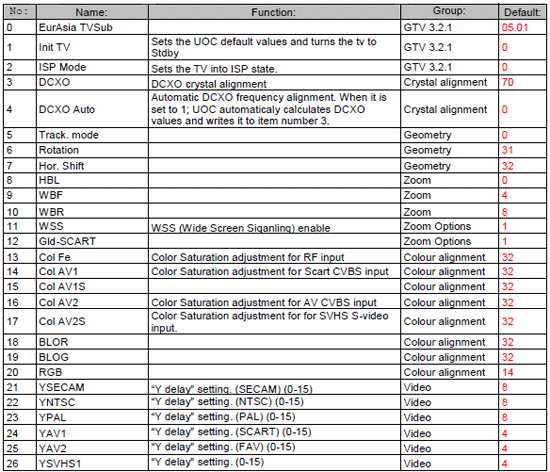
Check the following register values in the table from UOCIII Service Menu. Change them if they are not the same with the table below:

TV Service menu OEM 23" 17MB18

OEM 23" 17MB18 TV Service menu


OEM 17MB16 TV Service menu

Vestel | Author | June 28, 2015

OEM, Vestel chassis 17MB16 TV Service menu


OEM 17MB16P SERVICE MENU SETTINGS
All system, geometry and white balance alignments are performed in production service mode. Before
starting the production mode alignments, make sure that all manual adjustments are done correctly. To
start production mode alignments enter the main menu by pressing “M” button and then press the digits 4, 7, 2 and 5 respectively. The following menu appears on the screen.

After entering the Service menu, you can access its items by pressing “▲/▼” buttons. In order to enter selected menu, use “◄/►” buttons. To exit the service menu press “M” button.
Entire service menu parameters of TFT TV are listed below.

OEM 17MB16 TV Service menu ADJUST MENU SETTINGS
In order to enter Adjust menu, move the cursor to Adjust… parameter by pressing “▲/▼” buttons in
Service Menu and press “◄/►” button. The following menu appears on the screen.

OEM 17MB16 TV Service menu option menu settings
In order to enter Options menu, move the cursor to Options… parameter by pressing “▲/▼” buttons in Service Menu and press “◄/►” button. The following menu appears on the screen.

OEM 17MB16 TV Service menu

Photo credit : mswinds.com


OEM 27MB11 TV Service menu

Vestel | Author | June 26, 2015

OEM / VESTEL 27" MB11 TV Service mode

OEM / VESTEL 30" MB11 TV Service mode

Chassis 17MB11

All system, geometry and white balance alignments are performed in production service mode. Before
starting the production mode alignments, make sure that all manual adjustments are done correctly. To
start production mode alignments enter the MENU by pressing “M” button and then press the digits 4, 7, 2 and 5 respectively. The following menu appears on the screen.

TV Service menu OEM 27MB11


There are 4 submenus in service menu. These are display, calibration, deinterlacer and factory
settings menus. Press “◄/►” buttons to select a menu title and then “▲/▼” buttons to select a menu
item and “◄/►” or “OK” buttons to set the menu item to the desired option. To exit the service menu
press “M” button.
Entire service menu parameters of TFT TV are listed below.
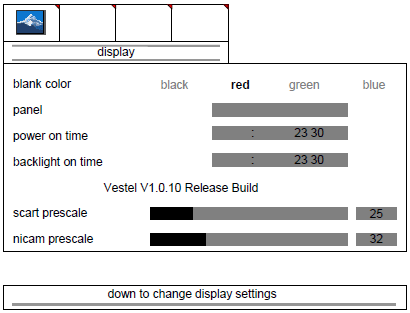
13.1. display menu
By pressing “◄/►” buttons select the first icon. display menu appears on the screen.
Blank color
By pressing “▲/▼” button, select blank color. Press “◄/►” button to set the blank color. The options are:
black, red, green and blue.
Panel
Displays panel resolution.
Power on time
Displays total working time of the set
Backlight on time
Displays total backlight on time of the set.
Scart prescale
By pressing “▲/▼” button, select scart prescaler. Press “◄/►” button to set the scart prescaler. Scart
prescale can be adjusted between 0 and 127.
nicam prescale
By pressing “▲/▼” button, select nicam prescaler. Press “◄/►” button to set the nicam prescaler. Nicam
prescale can be adjusted between 0 and 127.
Fm/am prescale
By pressing “▲/▼” button, select fm/am prescaler. Press “◄/►” button to set the fm/am prescaler. Fm/am
prescale can be adjusted between 0 and 127.
Subwoofer corner
By pressing “▲/▼” button, select subwoofer corner. Press “◄/►” button to set the subwoofer Corner.
Subwoofer corner can be adjusted between 0 and 7.
Subwoofer level
By pressing “▲/▼” button, select subwoofer level. Press “◄/►” button to set the subwoofer level.
Subwoofer level can be adjusted between 0 and 32.
Agc adjustment
Adjustment for automatic gain control of tuner. By pressing “▲/▼” button, select agc adjustment. Press “◄/►” button to set the agc adjustment. Agc adjustment can be adjusted between 0 and 31.
Carrier mute
By pressing “▲/▼” button, select carrier mute. Press “◄/►” button to enable or disable the sound carrier
mute feature.
Virtual dolby
By pressing “▲/▼” button, select virtual dolby. Press “◄/►” button to enable or disable the virtual dolby feature in the audio menu of the TV.
Virtual dolby hardware
By pressing “▲/▼” button, select virtual dolby hardware. Press “◄/►” button to enable or disable the virtual dolby hardware feature of the TV.
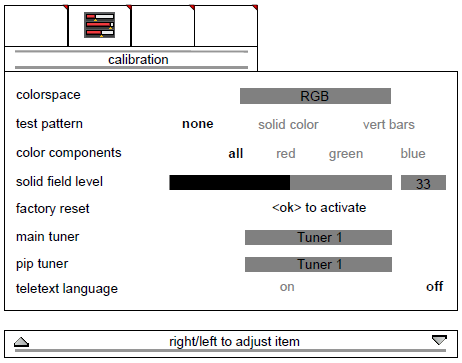
calibration menu
By pressing “◄/►” buttons select the second icon. calibration menu appears on the screen.
Initial APS
By pressing “▲/▼” button, select initial APS. Initial APS can be selected on or off. If initial aps is
switched on, then the TV will display initial APS menu only for the first time it is switched on.
burn-in mode
By pressing “▲/▼” button, select burn-in mode. Press “◄/►” button to set it on or off.
Color temp
By pressing “▲/▼” button, select color temp. Press “◄/►” button to set the color temperature. The
options are: 5500K, 6500K, 7500K, 9300K and user.
R/G/B
If color temp is set as “user”, then R/G/B settings can be adjusted. By pressing “▲/▼” button, select
Red, Green or Blue. Press ► button to increase the color value. Press ◄ button to decrease the color
value. R/G/B values can be adjusted between 0 and 63.
Video format
By pressing “▲/▼” button, select video format. Press “◄/►” button to set the video format. The options are: auto, ntsc, pal, secam and ntsc japan.

OEM 27MB11


OEM 17MB08P TV Service menu

Vestel | Author | June 24, 2015

OEM / Vestel 26” TFT 17MB08P TV Service menu mode

SERVICE MENU SETTINGS
All system, geometry and white balance alignments are performed in production service mode. Before
starting the production mode alignments, make sure that all manual adjustments are done correctly. To
start production mode alignments enter the main menu by pressing “M” button and then press the digits 4, 7, 2 and 5 respectively.

After entering the Service menu, you can access its items by pressing “▲/▼” buttons. In order to enter
selected menu, use “◄/►” buttons. To exit the service menu press “M” button.
Entire service menu parameters of TFT TV are listed below.

ADJUST MENU SETTINGS
In order to enter Adjust menu, move the cursor to Adjust… parameter by pressing “▲/▼” buttons in
Service Menu and press “◄/►” button.

OPTIONS MENU SETTINGS
In order to enter Options menu, move the cursor to Options… parameter by pressing “▲/▼” buttons in
Service Menu and press “◄/►” button. The following menu appears on the screen.

TV Service menu OEM 17MB08P

OEM 17MB08P TV Service menu

Photo credit : meddiodesign.com


There are 50 items in the OPTIONS menu, but 10 of them are seen when you first enter the menu. Using
“▲/▼” buttons remaining items can be seen.
Hue On/Off
Enables / disables Hue option in Picture menu.
First APS On/Off
If ON, TV starts with APS menu at Start-up.
A.P.S On/Off
Enables / disables Automatic Programming System.
Headphone On/Off
Enables / disables the usage of the HP and HP related items in Sound menu.
Vsr On/Off
Enables / disables Vsr.
DBE On/Off
Enables / disables DBE.
Subwoofer On/Off
Enables / disables Subwoofer.
Lineout On/Off
Enables / disables Lineout.
Dolby prologic On/Off
Enables / disables dolby prologic system.
Equalizer On/Off
Enables / disables equalizer system.
BG On/Off
Enables / disables BG Standard.
DK On/Off
Enables / disables DK Standard.

Nicam Prs Avl On
Adjusts the Nicam Prescaler value, when Automatic Volume Levelling is On.
Min. Value: 0000 00000
Max. Value: 00FF 00255
Scart Prs Avl On
Adjusts the Scart Prescaler value, when Automatic Volume Levelling is On.
Min. Value: 0000 00000
Max. Value: 00FF 00255
Scart Volume Avl On
Adjusts the Scart Volume value, when Automatic Volume Levelling is On.
Min. Value: 0000 00000
Max. Value: 00FF 00255
FM Prs Avl Off
Adjusts the FM Prescaler value, when Automatic Volume Levelling is Off.
Min. Value: 0000 00000
Max. Value: 00FF 00255
Nicam Prs Avl Off
Adjusts the Nicam Prescaler value, when Automatic Volume Levelling is Off.
Min. Value: 0000 00000
Max. Value: 00FF 00255
Scart Prs Avl Off
Adjusts the Scart Prescaler value, when Automatic Volume Levelling is Off.
Min. Value: 0000 00000
Max. Value: 00FF 00255
Scart Volume Avl Off
Adjusts the Scart Volume value, when Automatic Volume Levelling is Off.
Min. Value: 0000 00000
Max. Value: 00FF 00255
Hotel VoD On/Off
Enables / disables Hotel Video-on-Demand feature.

APS WSS TEST MENU
In order to enter Aps Wss Test menu, move the cursor to Aps Wss Test parameter by pressing “▲/▼” buttons in Service Menu and press “◄/►” button.


Vestel 23" 17MB08 TV Service menu

Vestel | Author | June 22, 2015

Vestel 23" 17MB18 TV Service menu

OEM, Vestel, Toshiba chassis 17MB18P

OPTIONS MENU SETTINGS
In order to enter Options menu, move the cursor to Options… parameter by pressing “▲/▼” buttons in Service Menu and press “◄/►” button. The following menu appears on the screen.

There are 50 items in the OPTIONS menu, but 10 of them are seen when you first enter the menu. Using “▲/▼” buttons remaining items can be seen.
Hue On/Off
Enables / disables Hue option in Picture menu.
First APS On/Off
If ON, TV starts with APS menu at Start-up.
A.P.S On/Off
Enables / disables Automatic Programming System.
Headphone On/Off
Enables / disables the usage of the HP and HP related items in Sound menu.
Vsr On/Off
Enables / disables Vsr.
DBE On/Off
Enables / disables DBE.
Subwoofer On/Off
Enables / disables Subwoofer.
Lineout On/Off
Enables / disables Lineout.
Dolby prologic On/Off
Enables / disables dolby prologic system.
Equalizer On/Off
Enables / disables equalizer system.
BG On/Off
Enables / disables BG Standard.

Service menu Vestel 23" 17MB08 TV

Vestel 23" 17MB18 TV Service menu

Photo credit : mswinds.com


Features
• 20 to 85 MHz shift clock support
• Best–in–Class Set & Hold Times on TxINPUTs
• Tx power consumption <130 mW (typ) @85MHz Grayscale
• Tx Power-down mode <200μW (max)
• Supports VGA, SVGA, XGA and Single/Dual Pixel SXGA
• Narrow bus reduces cable size and cost
• Up to 2.38 Gbps throughput
• Up to 297.5 Megabytes/sec bandwidth
• 345 mV (typ) swing LVDS devices for low EMI
• PLL requires no external components
• Compatible with TIA/EIA-644 LVDS standard
• Low profile 56-lead or 48-lead TSSOP package
• DS90C385 also available in a 64 ball, 0.8mm fine pitch ball grid array (FBGA) package


OEM 32WH37G TV Service menu

Vestel | Author | June 20, 2015

OEM 32WH37G Chassis 11AK41 

Toshiba Chassis 11AK41

Vestel Chassis 11AK41 


A) PRELIMINARY
All system, geometry and white balance alignments are performed in production service mode.
Before starting the production mode alignments, make sure that all manual alignments are done correctly. To start production mode alignments enter the MAIN MENU and enter the code 1675 by pressing digit keys. Production mode items will appear on the screen. Production mode groups will be displayed with different colours of headlines , so in order to access a production alignment group press the colour key of the related group on the remote control transmitter. After selecting one of the production service mode groups, you can access its items by pressing the cursor-up and / or cursor-down keys. You can change the value of an item by pressing cursor-lefi and / or cursor-right keys on the remote control transmitter.
In order to switch between other group of items press the colour key of this groups headline.
To store the settings press OK key. In order to leave this menu press MENU key.

B) HORIZONTAL AND VERTICALGEOMETRY ALIGNMENTS
- Switch the program to crosshatch test pattern.
- Press RED key to access this group of item.
- Select the items by pressing cursor-up and/or cursor-down keys.
- Adjust the item by pressing cursor-left and/or cursor-right after selecting that item.
- Store the settings by pressing OK key.
- Switch to another item group by pressing the colour keys of the related coloured headline of that group.
- Exit production mode by pressing the MENU key on the remote transmitter..
1) V-SHIFT
- Press cursor-left and/or cursor-right buttons till the test pattern is vertically centred, i.e. horizontal line at the cetle of the test pattern is in equal distance both to upper and lower side ofthe picture tube. Check and readjust V-SHlF'ltem if the adjustment becomes improper after some other geometric adjustments are done
2) V-SIZE
- Press cursor-left and/or cursor-right buttons till horizontal black lines on both the upper and lower part of the test pattern become very close to the upper and lower horizontal sides of picture tube and nearly about to disappear. Check and readjust V-SIZE item ifthe adjustment becomes improper afler some other geometric adjustments are done.

TV Service menu OEM 32WH37G

OEM 32WH37G TV Service menu

Photo credit : mswinds.com


3) H-SHIFT
-Adjust H-SHIFT item by pressing cursor-left and/or cursor-right buttons till test pattern is horizontally in equal distance both to right and left sides of the picture tube. Check and readjust H-SHIFT item ifthe adjustment becomes improper after some other geometric adjustments are done.
4) H-SIZE
-Adjust H-WIDTH item by pressing cursor-left and/or cursor-right buttons till no under-scan condition will happen, i.e. no white bars on the left and right side of the test pattern will be visible nor the picture will be so wide. Check and readjust H WIDTH item if the adjustment becomes improper after some other geometric adjustments are done.
5) S-COR
- Press cursor-left and/or cursor-right buttons till the size of squares on both the upper and lower part of test pattern become equal to the squares laying on the vertical centre of the test pattern. Check and readjust S-COR item if the adjustment becomes improper after some other geometric adjustments are done.
6) LINRT
- Press cursor-left and/or cursor-right buttons till all the size of squares of the test pattern become in equal size from the top of the screen to its bottom of the whole screen. Check and readjust LINRT item ifthe adjustment becomes improper after some other geometric adjustments (especially after than S-COR adjustment are done.
7) ANGLE
- Press cursor-lefl and/or cursor-right buttons till the vertical lines of the crosshatch pattern become completely perpendicular to horizontal lines without any angle of vertical deviation. Check and readjust ANGLE item if the adjustment becomes improper after some other geometric adjustments are done.
8) BOW
- Press cursor-left and/or cursor-right buttons till the vertical lines especially ones close to the left and right sides wibf equal and symmetrical bending, i.e. they together will neither be towards left side nor right side. Check and readjust BOW item ifthe adjustment becomes improper after some other geometric adjustments are done.
9) TRPEZ
- Press cursor-left and/or cursor-right buttons till vertical lines, especially lines at the sides of the picture frame became parallel to the both sides of picture tube as close as possible. Check and readjust TRPEZ item if the adjustment becomes improper after some other geometric adjustments are done.
10) PARAB
- Press cursor-lefl and/or cursor-right buttons till vertical lines close to the both sides of the picture frame become paralle to vertical sides of picture tube without any bending to left or to right side of the screen.. Check and readjust PARAB item if the adjustment becomes improper after some other geometric adjustments are done.

11) U. COR
- Press cursor-left and/or cursor-right buttons till vertical lines at the upper corners of the picture frame become vertical and parallel to vertical corner sides of picture tube. Check and readjust U. COR item if the adjustment becomes improper after some other geometric adjustments are done.
12) L. COR
- Press cursor-left and/or cursor-right buttons till vertical lines at the lower corners of the picture frame become vert and parallel to vertical corner sides of picture tube. Check and readjust L. COR item if the adjustment becomes improper after some other geometric adjustments are done.
C) VIDEO ALIGNMENTS
- Switch the program to crosshatch test pattern for geometric adjustments.
- Switch the program to colour bar test pattern for video adjustments.
- Press GREEN key to access this group of item.
- Select the items by pressing cursor-up and/or cursor-down keys.
- Adjust the item by pressing cursor-left and/or cursor-right after selecting that item.
- Store the settings by pressing OK key.
- Switch to another item group by pressing the colour keys of the related coloured headline of that group.
- Exit production mode by pressing the MENU key on the remote transmitter..
1) RGn, GGn, BGn: WHITE BALANCE ADJUSTMENT
-Apply WHITE test pattern via RF.
Adjust all analogue functions to medium level and set GGn, RGn, BGn at value 80, if needed.
Use Colour analyser and monitorthe colourtemperature (X, Y) on colour analyser.
Select RGn and BGn by cursor-up and/or cursor-down buttons and change the values by cursor-left and/or cursor-right buttons till the following values are read:X=285:10 Y=293110 on the colour analyser.
2) RRf, GRf, BRf
Set the values of these items as 62 (constant).
3) YDF
Apply COLOUR BAR test pattern. Select YDF item cursor-up and/or cursor-down buttons.
Adjust YDF by pressing cursor-left and/or cursor-right buttons till the colour transients on the colour bar pattern be- comes as sharper and possible as colours between transients do not mix with each other. Check and readjust YDF item if the adjustment becomes improper after YDV adjustment is done.
4) AGC
Apply PAL BG signal, VHF-3 Channel-12 and 6OdBmV RF signal level.
Adjust AGC itemtill voltage at the AGC point (pin1 of the tuner) becomes 3.0 volts.
5) TLAN
This item and its settings will be defined later.
6) APS
This value ofthis item toggles between ON and OFF while pressing the cursor-left and cursor-right afterthis item is selected by cursor-up and/or cursor-down buttons.
In orderto activate APS installation procedure whenever TV is turned select ON forthe very first time.
In orderto start TV without APS installation procedure select OFF.
7) T_T
This item is used for the Tuner Selection.
SAM, THO, SIE, ALP, MK2 and MK3 are for Samsung, Thomson, Siemens, Alps and Philips MP2/MP3, respectivel
8) T_P
This item is used for the Tuner Selection.
SAM, THO, TEM, and MK2 are for Samsung, Thomson, Temic, and Philips, respectively.
9) EXT3
This item istoggles between ON and OFF and is used to enable and disable EXT3, respectively.
10) CLT
This item is used to set the Menu colors. 5 choices are possible.


Vestel All model TV Service menu

Vestel | Author | June 17, 2015

Vestel All model chassis 11AK19

Vestel chassis 11AK19 Factory mode ADJUSTMENTS PROCEDURE
In order to enter the service mode, first enter the installation menu (or press blue button on the remote
control handset) and then press the digits 4, 7, 2 and 5 respectively.

For ADJUST Vestel chassis 11AK19 settings:
Select Adjust using Channel down or Channel up button and press volume down or or volume up button to enter it. To select different adjust parameters, use down or up button.
To change the selected parameter, use > or < button.
Vestel chassis 11AK19 WHITE BALANCE ADJUSTMENT:
The following three parameters are used to make white balance adjustment. To do this, use a Colour Analyser. Using white point RED, white point GREEN and white point BLUE parameters, insert the + sign in the square which is in the middle of the screen.
ADJUST 00 = White Point RED
ADJUST 01 = White Point GREEN
ADJUST 02 = White Point BLUE

AGC ADJUSTMENT Vestel chassis 11AK19:
In order to do AGC adjustment, enter a 60dBmV RF signal level from channel C-12.
Connect a digital voltmeter to pin 1 of the tuner. Change the AGC parameter until you see 3.70VDC on voltmeter display. Check that picture is normal at 90dBmV signal level.
IF-PLL NEGATIVE ADJUSTMENT (Only with PLL tuner):
Connect 38.9 MHz test pattern for PAL B/G, PAL-SECAM B/G, 39.5 MHz test pattern for PAL I or 45.75 MHz test pattern for PAL M/N, NTSC M model to Z401 SAW filter input terminals. Change the IF-PLL Negative parameter until you see IN, DOWN below. If you cannot catch IN, DOWN position this way, using a screwdriver rotate the VIF-COIL LT401 left or right until you see IN, DOWN.
IF-PLL POSITIVE ADJUSTMENT (Only with PLL tuner):
Connect 33.9 MHz test pattern for SECAM L’ model to Z401 SAW filter input terminals. Change the IF-PLL Positive parameter until you see IN, DOWN below. If you cannot catch IN, DOWN position this way, using a screwdriver rotate the VIF-COIL LT401 left or right until you see IN, DOWN.
LUMINANCE DELAY ADJUSTMENT (with only TDA 8844 video processor):
Y-Delay PAL
Enter a PAL B/G colour and black-white bar test pattern via RF. Adjust Y-Delay PAL till the colour transients on the colour bar of the pattern become as sharper and colours between transients do not mix with each other as possible.
Note: If the SAW filter is one of the G1965M, J1951M, J3950M, K2958M, K2962M, G3957M, K6256K, K6259K or M1963M, there is constant group delay distortion, so for an equal delay of the luminance and chrominance signal the delay must be set at a value of 160nS. This means the adjustment must be set to the maximum value.


TV Service menu Vestel All model

Vestel All model TV Service menu

Photo credit : meddiodesign.com

Vestel chassis 11AK19


Y-Delay SECAM
Enter a SECAM B/G colour and black-white bar test pattern via RF. Adjust Y-Delay SECAM till the colour transients on the colour bar of the pattern become as sharper and colours between transients do not mix with each other as possible.
Note: If the SAW filter is one of the G1965M, K2958M, K2962M, G3957M, K6256K or K6259K, there is constant group delay distortion, so for an equal delay of the luminance and chrominance signal the delay must be set at a value of 160nS.
This means the adjustment must be set to the maximum value.
Y-Delay NTSC
Enter an NTSC colour and black-white bar test pattern via RF. Adjust Y-Delay NTSC till the colour transients on the colour bar of the pattern become as sharper and colours between transients do not mix with each other as possible.
Note: If the SAW filter is M1963M, there is constant group delay distortion, so for an equal delay of the luminance and chrominance signal the delay must be set at a value of 160nS. This means the adjustment must be set to the maximum value.
Y-Delay Other
In case of other colour systems, enter this system with colour and black-white bar test pattern via RF. Adjust Y-Delay Other till the colour transients on the colour bar of the pattern become as sharper and colours between transients do not mix with each other as possible. Normally for an equal delay of the luminance and chrominance signal the delay must be set at a value of 160nS.
This means the adjustment must be set to the maximum value.

VERTICAL ZOOM ADJUSTMENT (only for 110ø picture tubes):
Enter a PAL B/G circle test pattern via RF. Change vertical zoom till you see the upper and lower limit of the circle as close to the upper and lower limit of the picture tube as possible.
VERTICAL SCROLL ADJUSTMENT (only for 110ø picture tubes):
Enter a PAL B/G circle test pattern via RF. Change vertical scroll till you see the circle exactly in the middle of the screen.
Vestel chassis 11AK19 HORIZONTAL SHIFT ADJUSTMENT:
Enter a RED PURITY test pattern via RF.Change horizontal shift till the picture is horizontally centred. Check whether this adjustment is correct after completing Service Mode Adjustment.
Vestel chassis 11AK19 VERTICAL SLOPE ADJUSTMENT:
Enter a CROSS-HATCH B/G test pattern via RF. Change vertical slope till the size of squares on both the upper and lower part of test pattern become equal to the squares laying on the vertical centre of the test pattern. Check and readjust VERTICAL SLOPE item if the adjustment becomes improper after some other geometric adjustments are done.
Vestel chassis 11AK19 VERTICAL AMPLITUDE ADJUSTMENT:
Enter a PAL B/G test pattern via RF. Change vertical slope till horizontal black lines on both the upper and lower part of the test pattern become very close to the upper and lower horizontal sides of picture tube and nearly about to disappear. Check and readjust VERTICAL AMPLITUDE item if the adjustment becomes improper after some other geometric adjustments are done.
Vestel chassis 11AK19 S-CORRECTION ADJUSTMENT:
Enter a PAL B/G circle test pattern via RF. Change S-correction till the middle part of the circle is as round as possible.
Vestel chassis 11AK19 VERTICAL SHIFT ADJUSTMENT:
Enter a PAL B/G test pattern via RF. Change Vertical Shift till the test pattern is vertically centred, i.e. horizontal line at the centre pattern is in equal distance both to upper and lower side of the picture tube. Check and readjust Vertical Shift item if the adjustment becomes improper after some other geometric adjustments are done.
EW WIDTH ADJUSTMENT (only for 110ø picture tubes):
Enter a PAL B/G test pattern via RF. Change EW Width till the vertical black and white bars on both left and right side of the pattern exactly disappear.
EW PARABOLA WIDTH ADJUSTMENT (only for 110ø picture tubes):
Enter a PAL B/G test pattern via RF. Change EW Parabola Width till vertical lines close to the both sides of the picture frame become parallel to vertical sides of picture tube. Check and readjust EW Parabola Width item if the adjustment becomes improper after some other geometric adjustments are done.
EW CORNER PARABOLA ADJUSTMENT (only for 110ø picture tubes):
Enter a PAL B/G test pattern via RF. Change EW Corner Parabola till vertical lines at the corners of both sides of picture frame become vertical and parallel to vertical corner sides of picture tube. Check and readjust EW Corner Parabola item if the adjustment becomes improper after some other geometric adjustments are done.
EW TRAPEZIUM ADJUSTMENT (only for 110ø picture tubes):
Enter a PAL B/G test pattern via RF. Change EW Trapezium till vertical lines, especially lines at the sides of the picture frame became parallel to the both sides of picture tube as close as possible. Check and readjust EW Trapezium item if the adjustment becomes improper after some other geometric adjustments are done.
HORIZONTAL SHIFT ADJUSTMENT:
Enter a RED PURITY test pattern via RF.Change horizontal shift till the picture is horizontally centred. Check whether this adjustment is correct after completing Service Mode Adjustment.
VERTICAL SLOPE ADJUSTMENT:
Enter a CROSS-HATCH B/G test pattern via RF. Change vertical slope till the size of squares on both the upper and lower part of test pattern become equal to the squares laying on the vertical centre of the test pattern. Check and readjust VERTICAL SLOPE item if the adjustment becomes improper after some other geometric adjustments are done.
VERTICAL AMPLITUDE ADJUSTMENT:
Enter a PAL B/G test pattern via RF. Change vertical slope till horizontal black lines on both the upper and lower part of the test
pattern become very close to the upper and lower horizontal sides of picture tube and nearly about to disappear. Check and
readjust VERTICAL AMPLITUDE item if the adjustment becomes improper after some other geometric adjustments are done.
S-CORRECTION ADJUSTMENT:
Enter a PAL B/G circle test pattern via RF. Change S-correction till the middle part of the circle is as round as possible.
VERTICAL SHIFT ADJUSTMENT:
Enter a PAL B/G test pattern via RF. Change Vertical Shift till the test pattern is vertically centred, i.e. horizontal line at the centre pattern is in equal distance both to upper and lower side of the picture tube. Check and readjust Vertical Shift item if the adjustment becomes improper after some other geometric adjustments are done.


Vestel LCD 22' TV Service menu

Vestel | Author | March 30, 2015
Vestel LCD 22' 23' 25' 26' 32' TFT TV Service mode.
Turn on the television, press “M” button enter 4725. The menu show on the screen.
Factory menu mode entered, pressing “CH▲/ CH▼” to select parameters
Press  “V◄/ V►” buttons to change the value settings.
Press “M” button to exit from factory mode.

This code used for other model/type of Vestel TV

Note: Write down the original data before you make any change to avoid serious damage. Please restore use original data when your settings made is fail.

TV Service Menu Vestel

Vestel TV Service Menu

Photo credit : reezi.com


Vestel LCD 17MB25 TV Service menu

Vestel | Author | March 29, 2015
Vestel 17MB25 Service mode
VESTEL 17MB25 SERVICE MENU SETTINGS
In order to reach service menu, First Press “MENU” Then press the remote control
code, which is “4725”. In DTV mode, first press “MENU” and select “TV SETUP”.
Then, ENTER “4,7,2,5”.
Video Setup
Panel Info <..................................>
32_LC_SAC1
Blue Background <.....>
If “Menu” selected, “Blue Background” item is seen in “Feature” menu.
If “Yes” selected, “Blue Background” is on and not seen in “Feature” menu
Film Mode <.....>
If “Yes” selected, “Film Mode” feature is active.
Dynamic Contrast <.....>
If “Yes” selected, “Dynamic Contrast” feature is active.
Game Mode <...........>
If “Yes” selected, “Game Mode” feature is active
SRGB For PC <...........>
If “Yes” selected, PCs can use SRGB option.
Dynamic Noise Reduction<...........>
If “Yes” selected, “Dynamic Noise Reduction” feature is active
WSS Option<...........>
If “Yes” selected, WSS Option can be used.


TV Service menu Vestel LCD 17MB25

Vestel LCD 17MB25 TV Service menu

Photo credit : www.petagazine.com

Vestel 17MB25 Service mode AudioSetup
BG<.....>
Europe
New Zelland
Australia
No

DK<.....>
I<.....>
L<.....>
Equalizer <.....>
If “Yes” selected, “Equalizer” item is seen in “Sound” menu.
Headphone <.....>
If “Yes” selected, “Headphone” item is seen in “Sound” menu.
Power On/Off Melody <.....>
If “Yes” selected, when power on/off conditions, the power on/off melody can be heard.
Dynamic Bass <.....>Value between 0 to 12 Effect<.....> Value between 0 to 7
Audio Delay ,offset <.....> Value between 0 to 190
Audio Setup Cont...2
Carrier mute<.......> Value between 0 to 28 Headphone Sound Select <.......>
Always Active Select
Always Inactive Select Menu
Always Main Menu
Always PIP/PAP Window
Sound Mode Detect Time <.......> Value between 0 to 255
Noise Reduction Threshold <.......> Value between 0 to 255
Noise Reduction Time <.......> Value between 0 to 15
AVL Attack Time <.......> Value between 0 to 255
AVL Release Time <.......> Value between 0 to 255
Prescales ( AVL On)
FM Prescale<.......> Value between 0 to 255
AM Prescale <.......> Value between 0 to 255
NICAM Prescale <.......> Value between 0 to 255
SCART Prescale <.......> Value between 0 to 255
FAV Prescale <.......> Value between 0 to 255
DTV Prescale <.......> Value between 0 to 255
HDMI Prescale <.......> Value between 0 to 255
YPbPr/PC Prescale <.......> Value between 0 to 255
An. USB Prescale <.......> Value between 0 to 255
Dig. USB Prescale <.......> Value between 0 to 255
Prescales ( AVL Off)
FM Prescale<.......> Value between 0 to 255
AM Prescale <.......> Value between 0 to 255
NICAM Prescale <.......> Value between 0 to 255
SCART Prescale <.......> Value between 0 to 255
FAV Prescale <.......> Value between 0 to 255
DTV Prescale <.......> Value between 0 to 255
HDMI Prescale <.......> Value between 0 to 255
YPbPr/PC Prescale <.......> Value between 0 to 255
An. USB Prescale <.......> Value between 0 to 255
Dig. USB Prescale <.......> Value between 0 to 255
Clipping Levels ( AVL On)
FM Clipping <.......> Value between 0 to 255
AM Clipping <.......> Value between 0 to 255
NICAM Clipping <.......> Value between 0 to 255
SCART Clipping <.......> Value between 0 to 255
FAV Clipping <.......> Value between 0 to 255
DTV Clipping <.......> Value between 0 to 255
HDMI Clipping <.......> Value between 0 to 255
YPbPr/PC Clipping <.......> Value between 0 to 255
An. USB Clipping <.......> Value between 0 to 255
Dig. USB Clipping <.......> Value between 0 to 255
Clipping Levels ( AVL Off)
FM Clipping <.......> Value between 0 to 255
AM Clipping <.......> Value between 0 to 255
NICAM Clipping <.......> Value between 0 to 255
SCART Clipping <.......> Value between 0 to 255
FAV Clipping <.......> Value between 0 to 255
DTV Clipping <.......> Value between 0 to 255
HDMI Clipping <.......> Value between 0 to 255
YPbPr/PC Clipping <.......> Value between 0 to 255
An. USB Clipping <.......> Value between 0 to 255
Dig. USB Clipping <.......> Value between 0 to 255

Service Scan/Tuning Setup
First Search for L/L’ <.......>
ATS Delay Time (ms) <.......> Value between 0 to +200

Vestel 17MB25 Service mode Main Tuner Setup
Tuner Type
LC_TDTC_GXX1D
Thomson DTT7543X
Philips TD1318AF-3
Samsung DTOs403LH172A
Generic ( Analog Only)
Control Byte <.......> Value between 0 to +255
BSW1 <.......> Value between 0 to +255
BSW2 <.......> Value between 0 to +255
BSW3 <.......> Value between 0 to +255
Low-Mid – Low Byte <.......>
Low-Mid – High Byte <.......>
Mid-High – Low Byte <.......>
Mid-High – High Byte <.......>
S Band TOP <.......>
VIF TOP <.......> Value between 0 to +15
VIF TOP SECAM <.......> Value between 0 to +15
VIF TOP DK<.......> Value between 0 to +15
Synch Threshold<.......> Value between 0 to +40

Vestel 17MB25 Service mode Options
Options-1
Power Up
Standby
Last state
TV Open Mode
Source
1st TV
Last Tv
First APS <.......>
If “Yes” selected, first time TV opens by asking APS.
APS Volume <.......> Value between 0 to +63 Burn In Mode <.......>
If “Yes” selected, TV opens with Burn-In mode. This mode is used in manufacturing.

APS Test
Autostore <.......>
If “Yes” selected, Channel is automatically stored.
Unicode Enabled <.......>
If “Yes” selected,Unicode characters can be read in the USB Files.
Options-2
Source List menu <.......>
If “Yes” selected, Sorce List Menu appears on the screen when press “source” button.
RS232 for B2B <.......>
If “Yes” selected, Remote Control commandsthe TV via RS232 and vice versa.
RC Select <.......>
RC Group 1
RC Group 2
RC Group 3
RC Group 4
RC Group 5
RC Group 6
Double Digit Key <.......>
If “Yes” selected, Double Digit Button on RC activates.
Protection <.......>
If “Yes” selected,short circuit protection activates.
Led Type <.......>
1 Led 1 Color
1 Led 2 Color
2 Led 2 Color
1 Led 3 Color
2 Led 3 Color
200 Programme <.......>
If “Yes” selected, totaly 200 programmes can be used.
TouchPad <.......>
If “Yes” selected, TouchPad can be used.

Teletext Options
TXT Darkness <.......> Value between 0 to +63
TXT Type <.......>
Fasttext&Toptext
No
Default
Fastext
Toptext
TXT Language <.......>
Menu
West
East
Cyrillic
Turk/Gre
Arabic
Persian
Auto
No Txt Warning <.......>
If “Yes” selected, “No Txt Transmission” warning appears on the screen when pressing txt button from RC.
Txt Subtitle <.......> If “Yes” selected, Teletext subtitles can be seen.

Optional Features Vestel 17MB25 Service mode
Default Zoom <.......>
Menu
16:9
4:3
Panaromic
14:9 Zoom
Menu Timeout <.......>
Menu
15 Sec
30 Sec
60 Sec
No Time
Backlight <.......>
If “Yes” selected, “Backlight” feature is active.
100 Step Slider <.......>
If “Yes” selected, 64 step sliders will become 100 step sliders.
Analog USB Enabled <.......>
If “Yes” selected, “Analog USB” option is active.
Menu Double Size <.......>
If “Yes” selected, menu sizes increases.
CEC Enable <.......>
If “Yes” selected, “CEC” feature is active.
Digital USB Hotplug <.......>
If “Yes” selected, “Digital USB Hotplug” feature is active.

Vestel 17MB25 Service mode PIP Options
Pip <......>
AV PIP
No PIP
PC PIP
Hotel Options <......>
Hotel TV <......>
If “Yes” selected, “Hotel TV” feature is active.
IR Smartloader <......>
If “Yes” selected, “IR Smartloader” feature is active.

External Source Settings
TV <.......>
DTV <.......>
Ext 2 <.......>
Ext 2 S <.......>
FAV <.......>
BAV <.......>
S-Video <.......>
HDMI 1 <.......>
HDMI 2 <.......>
HDMI 3 <.......>
HDMI 4 <.......>
YPbPr <.......>
PC <.......>

Preset
User Ad.j
ADC Adj.
Service Adj.
All Adj.
Init Factory Channels.
NVM Edit
NVM-edit addr. (hex)
NVM-edit data (hex)
NVM-data dec


Universal Remote

  • Chunghop RM-168GS code List
  • iWave Supersize Universal Remote
  • Automator URC 200 CD Players
  • Asaki Universal Remote for DVD
  • AMAZONE Universal Remote for DVD

CRT Television

  • Zenit TV Service Menu
  • Hisense HSM 515AV TV Service Menu
  • Grundig CUC 7301 TV Service menu
  • SIERA SG1420 TV Service Menu
  • RCA G27684 TV Service Menu


Plasma Television

  • Samsung HCH 551WX TV Service Menu
  • Beko L5C TFT LCD TV Service Menu
  • Beko LCD PLASMA L6E TV Service Menu
  • Beko Plasma TV Service Menu
  • Samsung Plasma TV Service Menu

LED Television

  • How to enter to Sansui TV Service Menu
  • LG 42LB62 LED TV Service Menu
  • Sanyo LED LCD TV Service Menu
  • How to enter to Telefunken TV Service Menu
  • Konka LED TV Service Menu

LCD Television

  • Hisense LCD 19V87 TV Service menu
  • Insignia NS LCD37HD-09 TV Service menu
  • Hisense K15 Series TV Service Menu
  • Hisense MT5380 TV Service menu
  • Grundig 42PX TV Service Menu


  • FORUM
  • Announce
  • Claim
  • Contributor
  • Universal Remote
  • Terms of Service
  • Privacy Policy
  • About
  • Contact
© 2008 - tvservicemenu. All Rights Reserved